[en] When creating complex labels and forms, it’s a challenge to keep track of all the items in the design window. Small objects get hidden under larger objects, and selecting an object becomes difficult. Layers provide a way to manage all the items that make up your label or form. Think of layers as transparent surfaces that allow you to place your objects on labels or forms in multiple levels. The vertical order of the objects (called stacking order or Z-order) contributes to the appearance of labels or forms.
[en] Layers help you manage the positioning and visibility of added objects. Layers give you added flexibility when you organize and edit objects in complex designs. You can place objects on multiple layers, each layer containing a part of the overall design. You would organize layers so that each layer contains the objects that belong together.
[en] For example, a label template might contain the following layers:
-
[en] Layer for preprinted data. You would scan the label as received from the manufacturer and place the image on a background layer and set it as non-printable.
-
[en] Layer for text objects. All dynamic text objects are placed on this layer.
-
[en] Layer for barcodes. All dynamic barcode objects are placed on this layer.
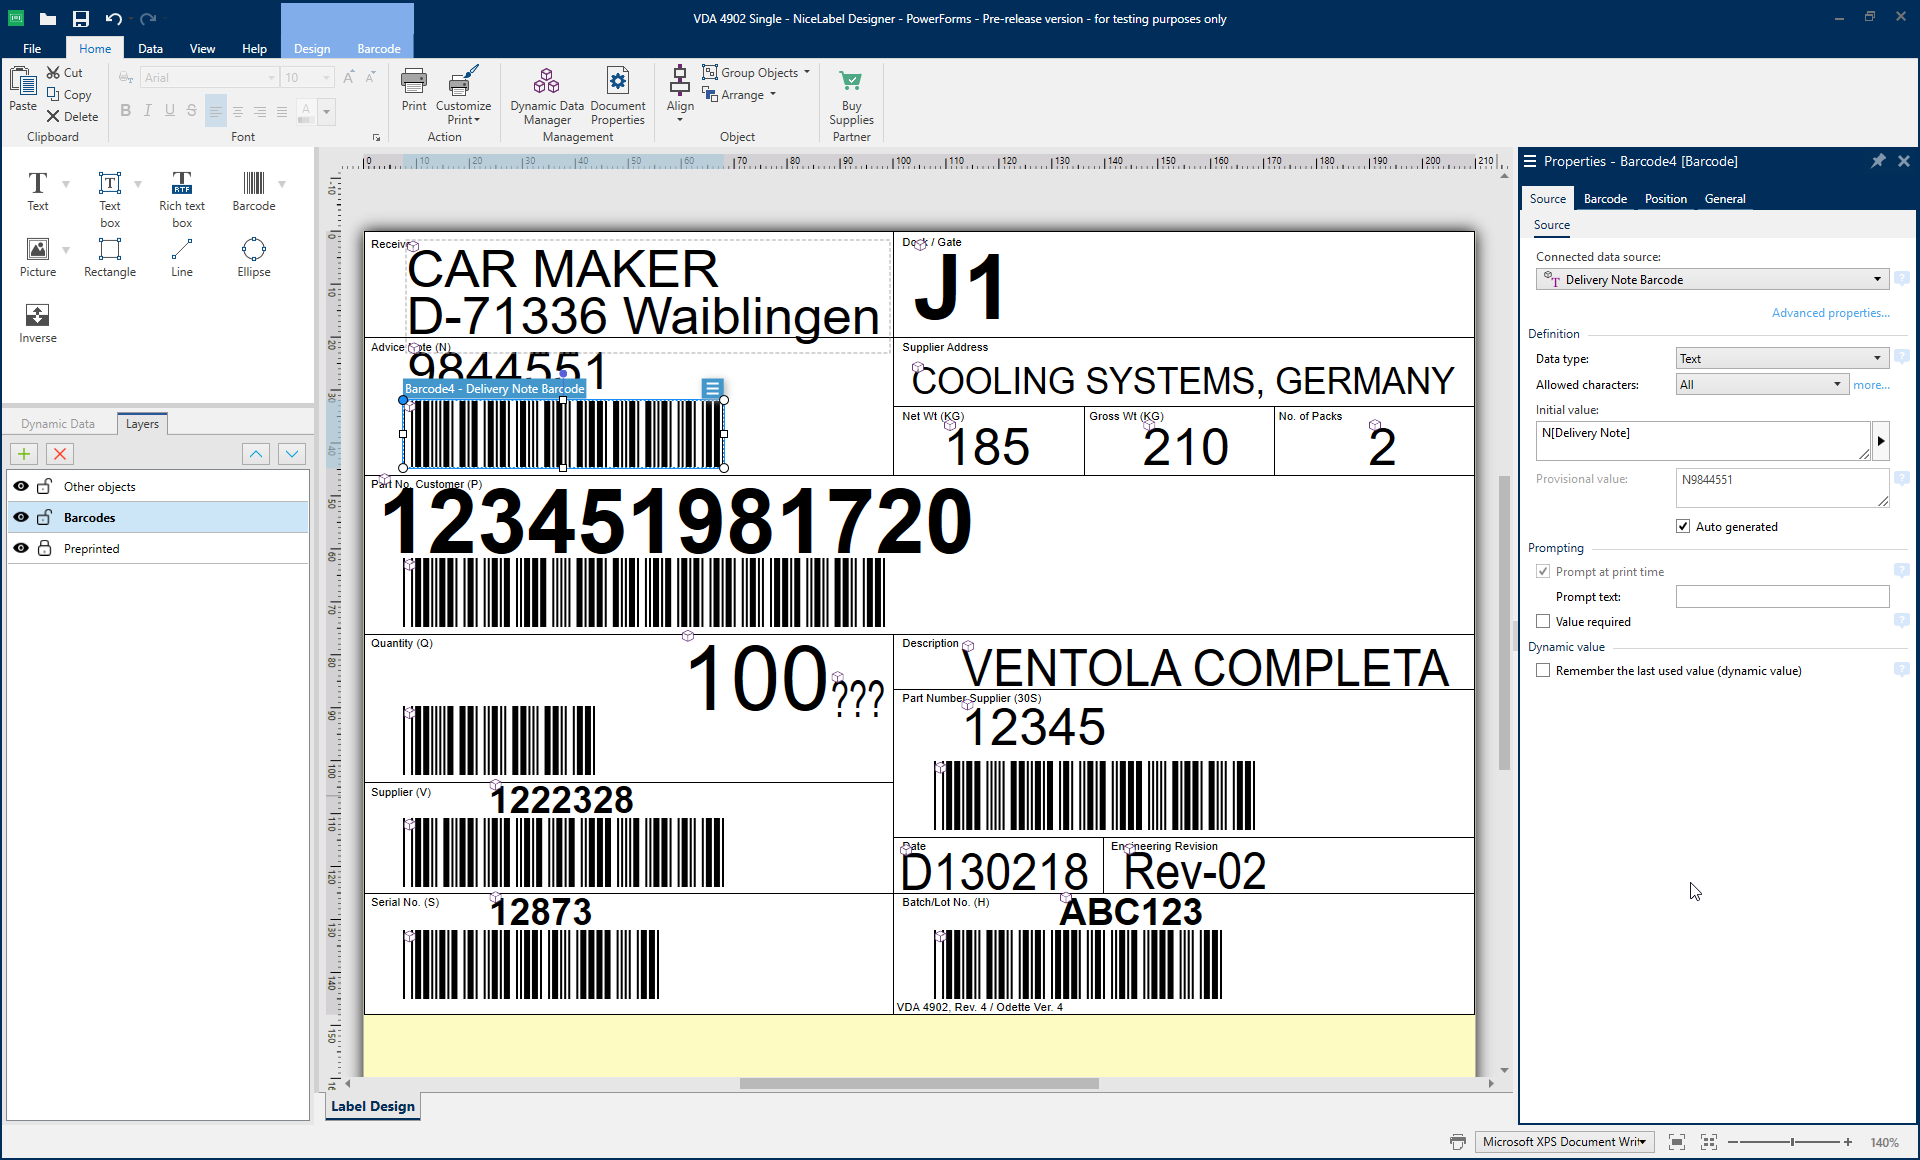 |
[en] Figure 2: Using layers during label design
[en] You can use layers for label and form designing. You can show or hide the layers while designing the solutions. You can also show or hide the layers on-demand as a result of the user’s interaction with the solution. The layering functionality makes it easy to configure multi-tab forms that are running within the same form.
 |
[en] Figure 3: Using layers during form designing
[en] When designing labels or forms with layers, you interact with the Layers panel. The panel helps you design adaptable label templates and create forms that align with your business logic. By default, every new label or form contains one layer. However, you can create as many new layers as you need and rearrange them.
[en] To print the formatted text objects in NiceLabel, you use the Rich text box object. This object uses RTF (rich text format) encoding to describe the content. NiceLabel Designer displays the true graphical representation of the RTF object while you are designing a label.
[en] NiceLabel uses a specific system component to display the formatted data. In NiceLabel 2019, you can switch between the system components. You can keep the default one that works best in most cases. If you need to print formatted data in language that uses right-to-left encoding (such as Arabic), you should switch to the alternative component.
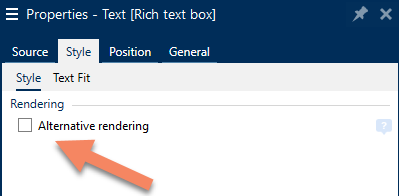 |
[en] Figure 4: Selecting an alternative component to render RTF content accurately
[en] The selection of the alternative provider could not be easier. In the Rich text box properties, select the Alternative rendering option. This option is set per the selected Rich text box and is saved with the label.
[en] NiceLabel 2019 provides support for object groups on a whole new level.
[en] In NiceLabel 2019, a group is treated as an independent object while designing labels or forms. A group is treated as a distinct object instead of a selection of individual objects. The group is a new object type. You can also copy and paste groups.
[en] As a result, there are several advantages for the designer:
-
[en] Alignment commands align a group as a single object preserving the distances between group objects.
-
[en] You can lock group position.
-
[en] You can fine-tune group placement using X and Y coordinates.
-
[en] You can define group visibility.
-
[en] You can position groups relative to other label objects or borders. Stand-alone objects can be relatively positioned to the group and to the object within a group. An object within a group can be relatively positioned only to the objects within the same group.
[en] Because the same group support is available in forms, you can use the existing Set Object Property action to edit group properties. Changing a group property propagates to all objects within the same group. Group object in the forms supports the following properties: X position, Y position, Enabled, and Visible.
[en] NiceLabel software is typically used for creating dynamic label templates. The label data is not stored inside the labels but is acquired from master data repositories and applied at print time. This technique minimizes the number of different label templates.
[en] When printing or previewing labels with dynamic objects, the Label Preview object shows the correct layout only after you provide the data. Traditionally, you would either enter the data manually or select it from a database. If manually providing data (e.g. during the testing), it might take a while to manually provide the label data.
[en] One solution for this challenge is to define provisional values for all your data sources in a label template. You can see the objects adapting to the values while you are designing your label. NiceLabel 2019 provides another method to see the label responding to various sets of data (test data or production-ready data). The Data Initialization object includes a new option to load sets of values from data files.
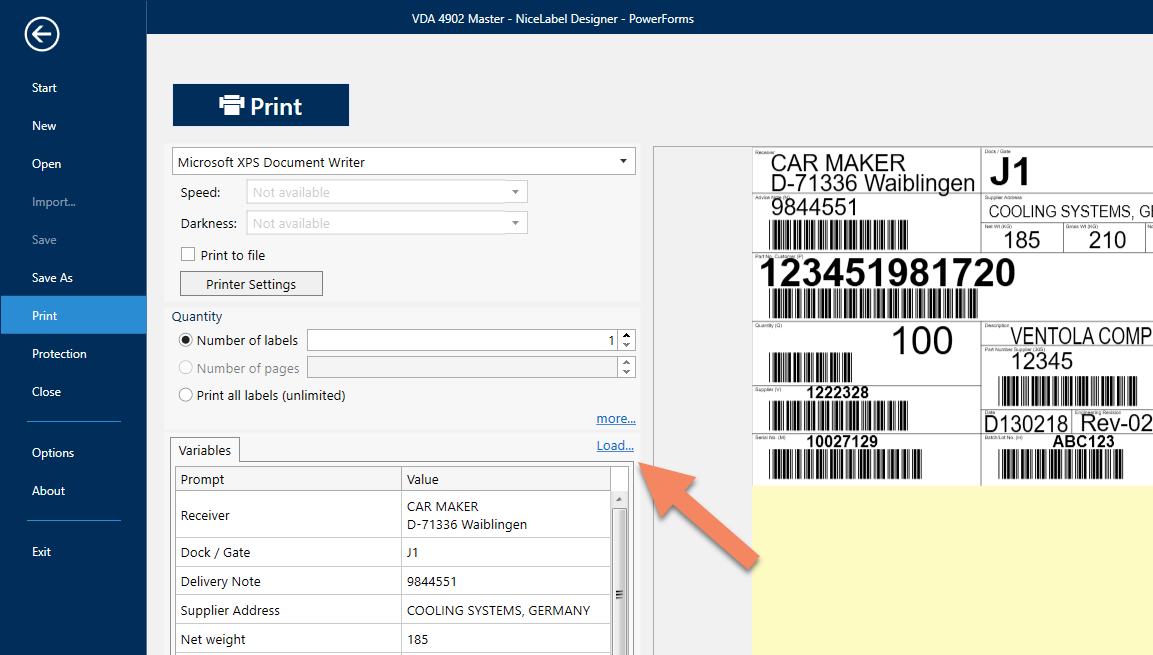 |
[en] Figure 5: The new option to load sets of values from data files
[en] NiceLabel supports data files with the following two structures of name-value pairs:
[en] XML file
[en] <variables>
[en] <variable name="var1">variable1</variable>
[en] <variable name="var2">variable2</variable>
[en] </variables>
[en] Text file
[en] var1=variable1
[en] var2=variable2
[en] NiceLabel 2019 reads all name-value pairs and applies them to label variables. If a label defines a variable with a specific name, this variable gets a value. Automatic mapping is done based on the matching names of fields (from the data file) and variables (from the label or solution).
[en] Visibility of the Load… function is configurable in the Data Initialization object properties.
[en] The Data Initialization object can also generate the XML file with name-values pairs of the existing variables if you need to send the data to the integration system for processing.
[en] NiceLabel 2019 uses an updated mechanism for data source importing. The mechanism now prevents generating of excessive data sources that carry similar names. In many cases, you would use the import functionality to convert labels or solutions created in NiceLabel version 6. In that version, labels and forms were detached entities saved in individual files. Each file defined its own data sources.
[en] NiceLabel 2019 uses the concept of solution files, in which labels and forms are saved in the same file and share the same data model. For complex labels and forms, you might face a challenge to merge the dispersed data models at a location that serves as the single-source-of-truth. When a data source of the same name exists in many labels or forms, and its properties are different from the already existing data source, NiceLabel 2017 created a new variable and added a suffix _1, _2, etc. to it. This way, you could end up with many data sources and it might take quite some time to simplify the structure to use a single data source.
[en] In NiceLabel 2019, the importing rules are more inclusive.
-
[en] Imported data sources override the existing data sources – instead of merging the parameters or creating new data sources with suffix _1.
-
[en] Data sources can only be replaced with data sources of the same type (e.g. variables with variables, functions with functions).
-
[en] When a variable with the same name from a different source file differs only in a default value, the merged variable's default value is removed instead of creating two variables with two different default values.
-
[en] When a variable with the same name from a different source file differs only in fixed length setting, the merged variable does not have a fixed length.
[en] NiceLabel 2019 provides firmer control over fonts used in a label during the printout.
[en] All textual objects in a label store the name of a font used with the objects. This is how you make sure label printout is the same on any computer. Of course, the prerequisite in this case is the availability of used fonts on all printing computers.
[en] By default, NiceLabel automatically finds a replacement font if the original font is not available. You can control the font replacement process using a functionality that is already available in NiceLabel. For example, use font replacement to create just one master label template and print it to various label printer brands/models without having duplicated labels optimized per printer.
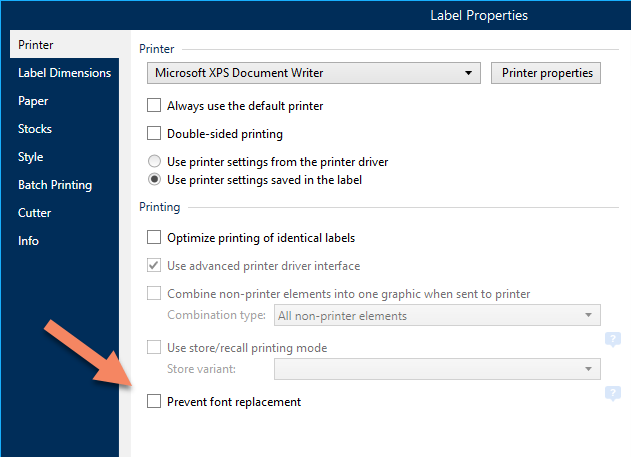 |
[en] Figure 6: New option is available in label properties
[en] Automatic font replacement can significantly change text layout and consequently the entire label design. Often you just want to print the label exactly as you have designed it. To prevent unwanted font replacement, the setting Prevent font replacement is added to label properties. When this setting is enabled, label printing stops if any of the fonts used in a label is not available.
[en] There are two reasons for missing label fonts:
-
[en] The font is not installed in Windows. This may happen if you design labels on one computer, and print labels on another computer that does not have these fonts installed.
-
[en] The font is not stored in printer memory. This may happen if you design labels for one printer, and print the labels using another printer that does not store these fonts.
[en] Prevent font replacement option stops printing if the labels are in “print mode”. This is when you are no longer editing labels in NiceLabel Designer, and you start printing them using print applications, such as NiceLabel Print, NiceLabel PowerForms, NiceLabel Automation, or NiceLabel Web Client.
[en] NiceLabel 2019 introduces a new default value for loading the printer settings.
[en] There are two possibilities from where NiceLabel loads the printer settings (such as printing speed, darkness, and possible offsets):
-
[en] Saved in the label file. In this case, the printer settings are stored for the label printer that you have selected in the label. This is fine if the label always prints to that printer, but you might have troubles when you want to print the same label using various printers.
-
[en] Recalled from the printer driver. In this case, the printer settings are not saved in the label. When you print a label, the defaults are read from the printer driver and are applied to the label. This functionality ensures that the label prints optimally using any target printer.
[en] When you create a new label in NiceLabel 2019, the default option for printer setting is Use printer settings from the printer driver. The new default does not affect the existing labels, which keep their current settings. This is the best-practice approach when you print the same label to multiple printers. The print operator cannot change the settings stored in the label but can fine-tune the driver settings on his computer.
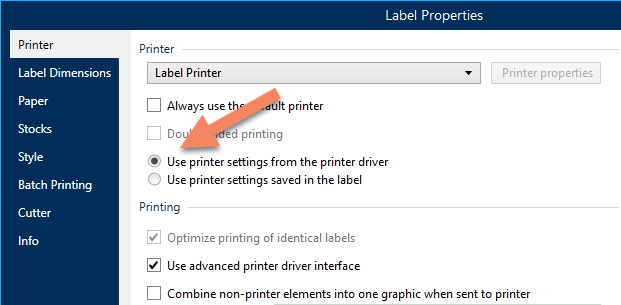 |
[en] Figure 7: New default for the origin of printer settings
[en] If you would like to keep the previous default, you can change it in NiceLabel Designer settings under File > Options > Designer > Printer Settings Source.
[en] NiceLabel 2019 includes an optimized ribbon for easier label designing. Shortcuts to options that were previously hidden are now easily accessible.
[en] The label designer’s job is to make sure the label layout fits the requirements. Label objects must be positioned correctly and aligned. During this process, the frequently used alignment commands in NiceLabel Designer are “align to top/bottom”, “align to left/right”, or “align to center”. NiceLabel 2019 has the alignment commands repositioned. They are displayed right in front of the designer – directly in the ribbon.
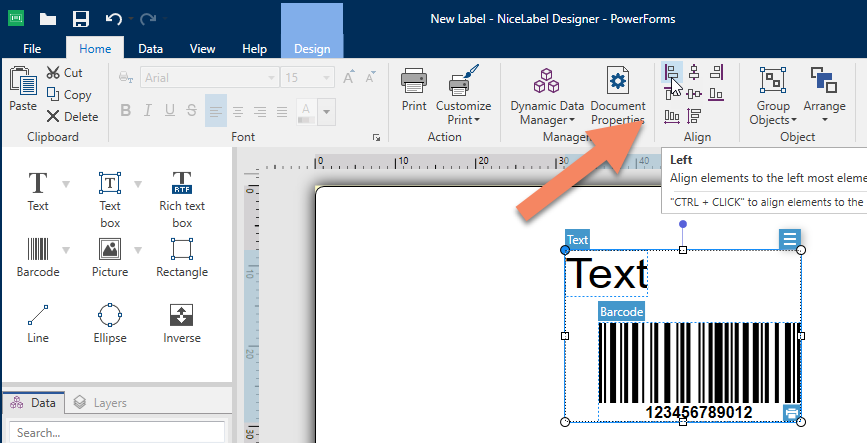 |
[en] Figure 8: Alignment commands available directly in the ribbon
[en] While the Dynamic Data Manager was already available to control your data sources, you had to open it to access some of the included commands. NiceLabel 2019 makes two frequently used commands available directly in the ribbon. You can select Import Data Sources and Prompt Order directly from the ribbon.
[en] NiceLabel 2019 improves the printing of all rotated linear and 2D barcodes.
[en] The rotated barcodes no longer print as bitmaps with the white-colored rectangular background. They print using individual vector lines instead of a single bitmap. This reduces the required amount of data in print streams to describe rotated barcodes. Rotated 2D codes that cannot be described as vector images are printed as PNG files with see-through transparent background.
[en] Avery Products Corporation has expanded the offering of labels for industrial uses, specifically in "Surface Safe Sign Labels", "Surface Safe ID Labels" and "UltraDuty GHS Labels" for letter paper size. NiceLabel supports these new labels using the internal database of label stocks.