[en] The clients in NiceLabel LMS products (Designer, Print, and Automation) support a new licensing mode.
[en] You no longer need to have the product license key available during the client activation. During the installation, you can select the activation option “NiceLabel Control Center connection”, and enter the address of your already active Control Center. The client automatically takes the license key from your Control Center and activates.
[en] The printer usage from the connected client is counted against the overall quota of printer seats associated with the license key in Control Center.
[en] NOTE: The new licensing mode is much like the activation via NiceLabel Label Cloud subscription.
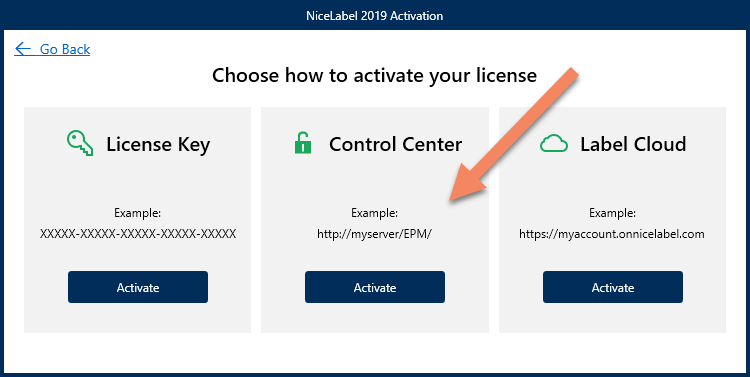
[en] Figure 8: New available activation option
[en] The new licensing mode provides the following benefits:
-
[en] No need to enter any license key. You must only know the address of your Control Center.
-
[en] No need to open any specific ports in the Windows firewall for client-to-client communication. The licensing data is exchanged just between the client and Control Center.
-
[en] Not bound to the domain/workstation membership or network settings. As long as you can see the Control Center web page, you can use it to activate your client.
[en] NiceLabel clients now include a diagnostics guide to troubleshooting connection issues with Control Center. NiceLabel Control Center is a web-based document management system, which requires a certain configuration on the clients.
[en] For example, the computer with the NiceLabel client must have installed support for WebDAV (Web Distributed Authoring and Versioning). This protocol allows the client to access files in a document management system. The computer must also have uninterrupted access to ports 80/443 and 8080 on the Control Center server.
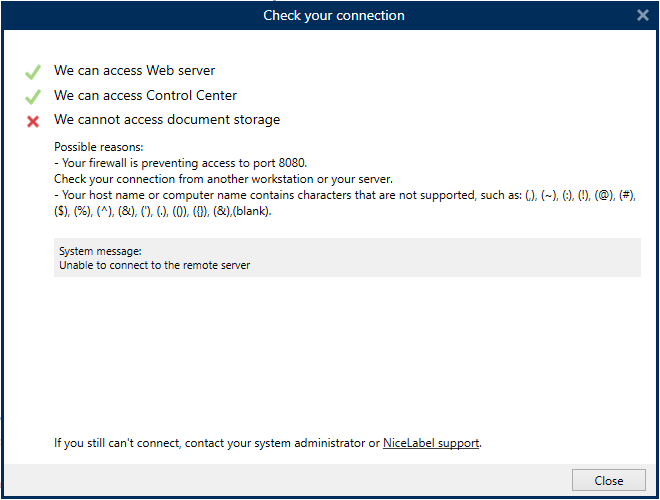
[en] Figure 9: Running diagnostic guide to troubleshooting problems
[en] The diagnostic guide verifies all connection requirements and provides a clear indication of issues and possible solutions.
[en] You can run the diagnostic guide from the activation screens, or later from File > Options > Control Center.
[en] The following database-related improvement are available:
-
[en] Support for Microsoft SQL Server 2019. On-premise NiceLabel Control Center and NiceLabel Web printing support installation on Microsoft SQL Server 2019.
-
[en] Support for installation to a cloud database. This release adds support for the Microsoft SQL Server that is running in cloud computing platforms and is available as a service. Often you would use the Azure SQL Database Managed Instance or Amazon Relational Database Service (RDS) with Microsoft SQL Server database engine. You no longer have to use the on-premise variant of Microsoft SQL Server to install the NiceLabel LMS products. Instead, you can choose a cloud variant, if that fits your company's IT policies better.
-
[en] Database installation tool can update passwords. The database installation tool (DB Tool) is a stand-alone utility for installing and updating the Control Center database outside the main installer. The DB Tool has been updated to allow changing names and passwords of users that are configured to access the system data, and can also change the database instance name of the already deployed NiceLabel installation.
[en] With previous versions, you might have stumbled upon an issue while activating your NiceLabel LMS 2019 upgrade without previously installed NiceLabel LMS 2017 products. In such case, you could either install the NiceLabel 2017 products and complete the upgrade, or install and activate the NiceLabel 2019 clients first, and install the NiceLabel Control Center when done.
[en] With this release, NiceLabel Control Center correctly recognizes the entered upgrade license key and prompts you to enter the original NiceLabel 2017 license that you wish to upgrade.
[en] The communication between NiceLabel clients and servers is compressed to save bandwidth.
[en] The communication stream is compressed between:
-
[en] Desktop clients and NiceLabel Control Center
-
[en] Web Client and NiceLabel Web Printing server
[en] NiceLabel installer automatically enables the prerequisites in your IIS:
-
[en] Web Sockets
[en] The following IIS prerequisites are no longer required and are not enabled in your IIS:
-
[en] CGI
-
[en] IIS Management Console
-
[en] Basic Authentication
[en] When versioning is enabled in Document Management System, you enable transparency of your labeling assets. You can track changes to files, restore items to previous versions, and compare versions of the same file to visually determine the differences.
[en] In this release, NiceLabel Control Center adds support for major and minor versioning. Major versions are identified by whole numbers, such as 2.0, while minor versions are identified by decimal numbers, such as 2.1. Typically, you would use minor versions during the development, and major versions when certain milestones are reached or when files are ready for review and testing. The new numbering system prevents having too many non-approved major versions, which might raise suspicion during the eventual audit inspection.
[en] Figure 10: Using major and minor versions
[en] If you also enable the approval workflows in Control Center, the minor (draft) versions are visible only to the owner and the users who have permissions to approve files. It is at the discretion of the owner to check in the file as a minor or as a major version. When the file is approved, it can be automatically converted into a major version (but this is a subject of approval workflow configuration).
[en] If your organization does not need to track major and minor versions of files, you can keep using the simple versioning scheme (such as 1, 2, 3).
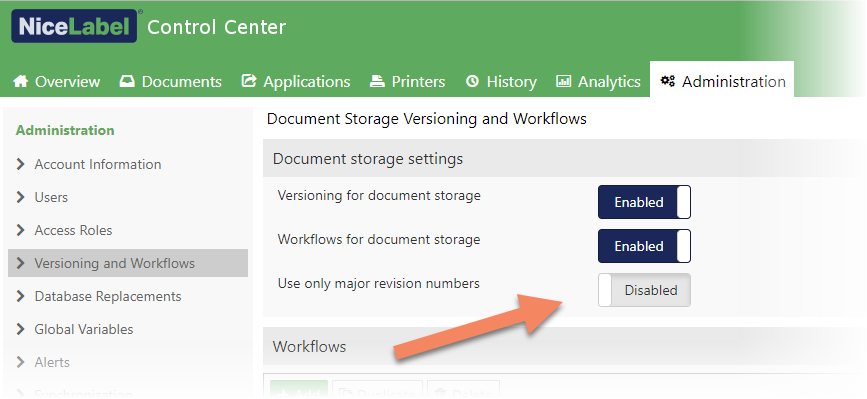
[en] Figure 11: Configuring the versioning type
Anmerkung
[en] Major and minor version scheme is on by default for new installations. Upgrades from previous versions keep the existing simple versioning scheme, but you can later enable the major and minor versioning scheme.
[en] Role-based access control refers to the idea of assigning permissions to the users based on their role within an organization. You grant permissions to roles not to users individually.
[en] NiceLabel Control Center introduces a brand new permission granting system. While you could define permissions on a much coarser level in previous versions, this release supports a fine-grained control of permission granting. Access to each part of Control Center is controlled by the permissions displayed in an understandable and organized way. For example, you can configure a role to have access to the history of print events, but to be prevented from having the ability to reprint labels or to see analytics data.
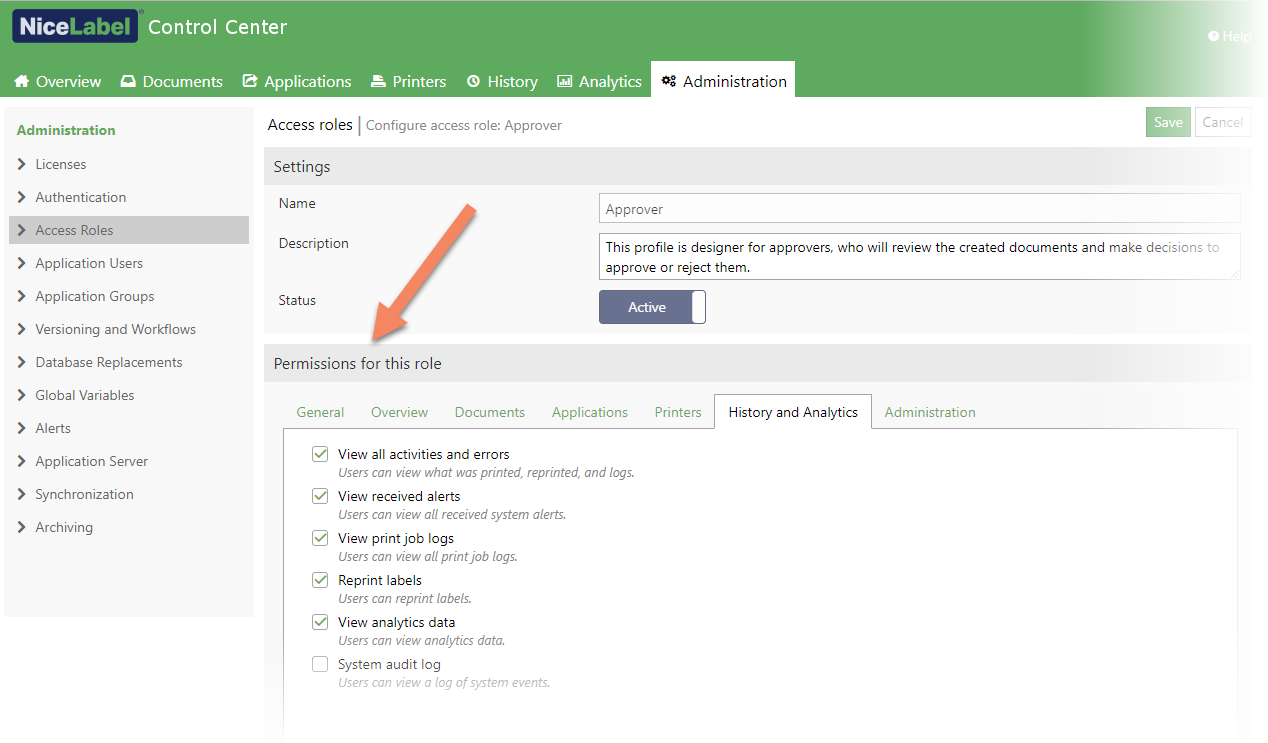
[en] Figure 12: Fine-grained configuration of permissions in NiceLabel software
[en] Many of the features that were previously locked to the Administration access role can now be removed and/or assigned to other roles. None of the permissions are hardcoded anymore. For example, you can create an administrator role to manage the Control Center, but to have no access to the files.
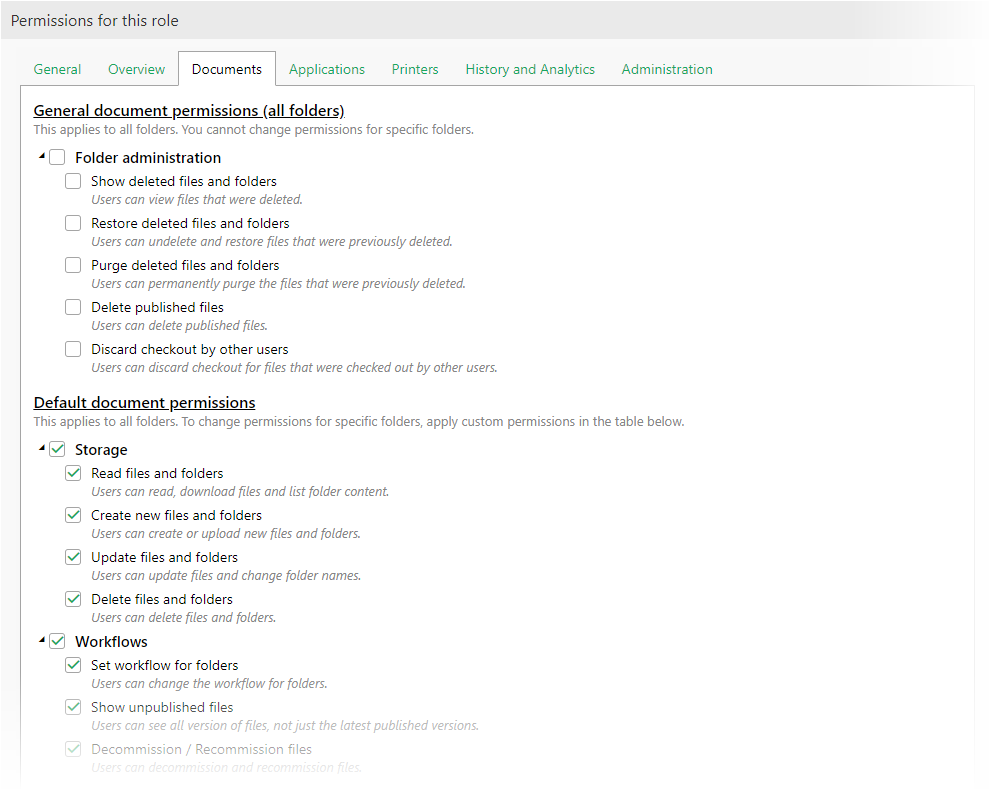
[en] Another redesign was done in regards to accessing the content in Document Storage. Permissions are no longer managed from within the Documents tab but have been moved into the Administration area where you manage all other aspects of role-based-access-control.
[en] The previously available basic level of file access permission has been enhanced with many detailed control options. What was hardcoded to the Administration role before is now freely configurable to better suit your quality assurance and security requirements. For example, the QA user can approve files, but cannot change or delete them.
[en] You can define general file access permissions once, and apply them to the entire content within the Documents. You can also fine-tune the permissions separately per each folder if needed. For example, you want members of a specific role to see just the folders they own, and not all folders within the Documents.
[en] Figure 13: Configuration of file access permissions
[en] More detailed logging of user activities is available in Control Center.
-
[en] Logging of remove and restore file operations. The file and folder events that remove and restore files in Document Storage are logged. The “System” category contains new audit logs for the following file operations:
-
[en] Delete
-
[en] Cut/paste
-
[en] Purge
-
[en] Restore
-
[en] Change folder permissions
-
[en] Commission, decommission
-
[en] Set workflow on the folder
-
[en] These event types cannot be bound to the file’s change history, as the file log is no longer accessible after you delete a file.
-
[en] Mandatory comment for commissioning. User comment is mandatory when commissioning and decommissioning a file.
-
[en] Mandatory comment for electronic signature. User comment is mandatory for each operation involving electronic signature.
-
[en] Failed electronic signature. The audit trail is added for the incorrect username and password when the electronic signature fails.
-
[en] Login & logout log in Control Center. The audit trail is added for all login and logout events in the Control Center. This functionality is available for on-premise LMS products when you use “application authentication” mode.
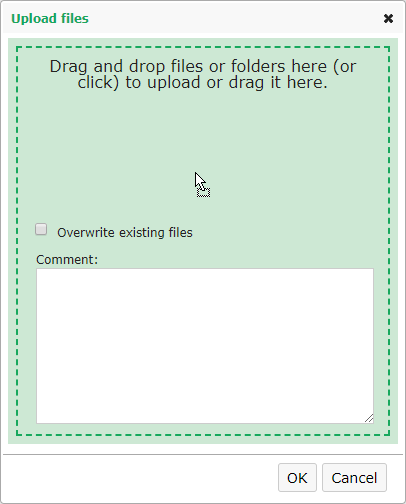
[en] The process of uploading files into the Documents tab has been simplified to a straightforward drag & drop operation. You can drag & drop the files into the “Upload files” window to upload them all at once.
[en] If you use a supported browser, you can also drag & drop the folder. All uploaded files in the folder and all subfolders keep the existing folder structure. If using older browsers, you can only drag & drop files.
[en] NOTE: Folder upload is available in Chrome, Firefox, and Edge, while Internet Explorer only supports file upload.
[en] Figure 14: Dragging & dropping files and entire folder structures in Document Storage
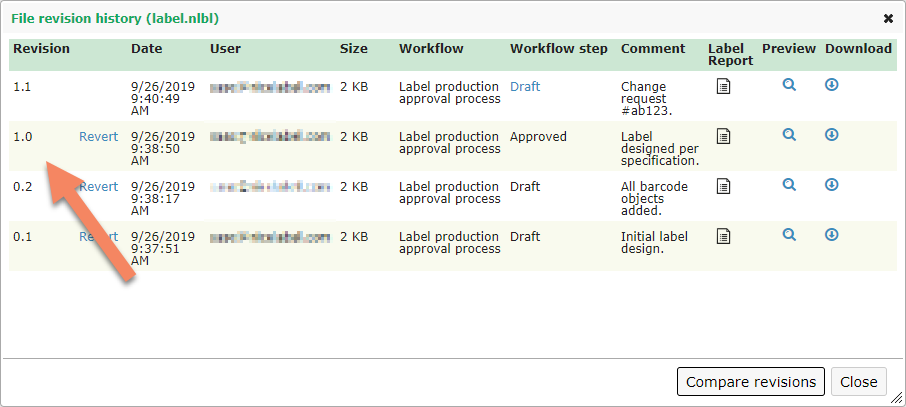
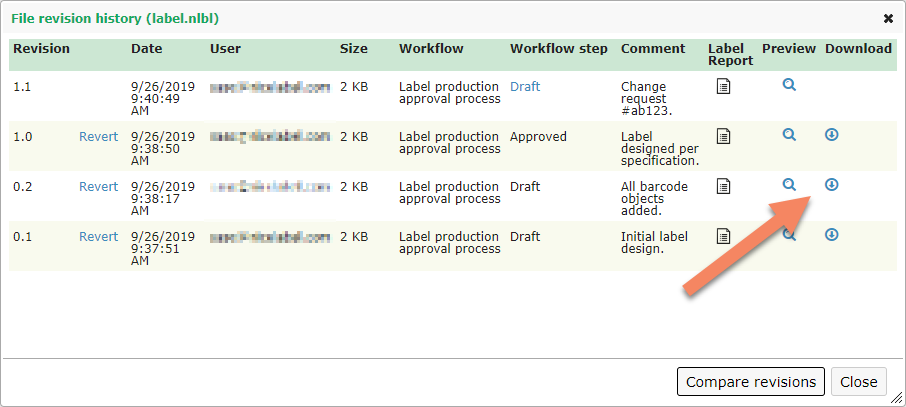
[en] You can download any previous file revision from the “File revision history” dialog box.
[en] Figure 15: Easy access to any previous file revision
Anmerkung
[en] This functionality is available for on-premise NiceLabel LMS Enterprise.
[en] NiceLabel LMS products store all labeling-related files in the Document Storage. Previously, access to the Document Storage used was available just for the users who signed in with Windows authentication, because files from Document Storage are exposed to NiceLabel clients over WebDAV protocol, which by default only supports Windows authentication.
[en] In this release, NiceLabel clients that use the application authentication mode can also work directly with files in the Document Storage. This enables seamless integration of DMS in the NiceLabel clients and simplifies file operations. For example, you can check out/check in your label templates directly from NiceLabel Designer.
Anmerkung
[en] This functionality is available for on-premise NiceLabel LMS Enterprise.
[en] The management of application users and groups in Control Center has been completely redesigned. The user interface is modern and follows the styling found elsewhere in Control Center. You can easily create the users, add users to groups, access roles or web applications, and search for them.
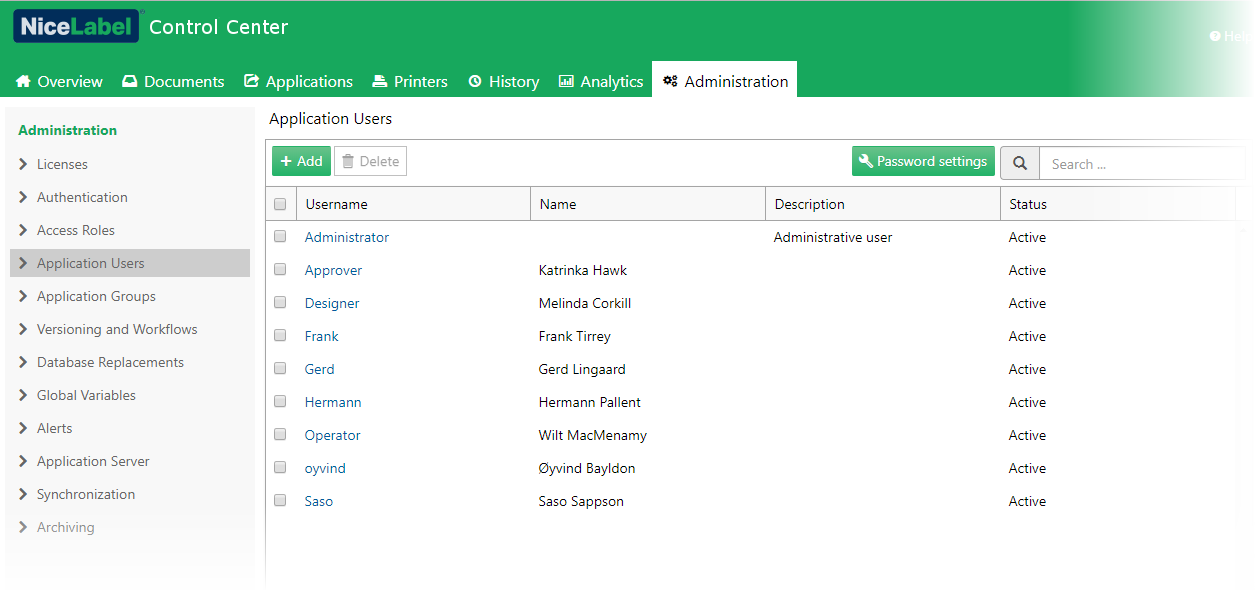
[en] Figure 16: New user management interface for application user management
[en] If your company operates in regulated industries, you must adhere to the requirements and guidelines established by agencies that control the authorization and licensing of the production and sales of products. The rules that govern each industry may differ, but they have one rule in common – user management.
[en] In this release, NiceLabel provides greatly enhanced procedures and practices for managing the application users. These are the users that you define inside the NiceLabel software as opposed to the users that are managed by some other authentication provider, such as Microsoft Active Directory.
[en] There is a number of improvements in the Control Center:
-
[en] Password complexity. The administrator can define password complexity rules combining the following:
-
[en] Password length
-
[en] Required use of uppercase and lowercase letters
-
[en] Required use of special characters
-
[en] Username cannot be part of the password
-
-
[en] Password validity. Passwords are valid for a specified number of days. When a user logs in after that period, they are notified that the password is invalid and are prompted to change it.
-
[en] Password history. The entered password must be different than the X number of previous passwords.
-
[en] User account suspension when an incorrect password is entered too many times. A user account is suspended after X number of failed login attempts. The event is logged to the system audit log.
-
[en] A user account is suspended after a period of inactivity. A user account is suspended after X days of inactivity. The event is logged to the system audit log.
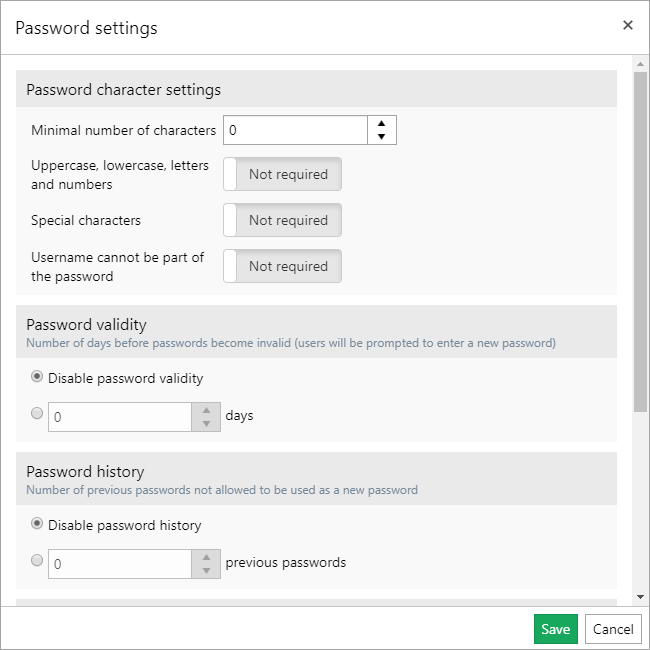
[en] Figure 17: Detailed password management
[en] Adding users to Web applications has been optimized. Now, shared web applications run much faster in organizations with many users, or where users are aggregated from multi-domain environments.
[en] The new user interface displays users from specific user groups, and introduces search in a list of all users, might they be defined as application users or available in the Active Directory. The improvement also addresses the behavior of displaying more than 1000 users and listing the AD users from trusted domains, which was not available in previous releases.
[en] If you prefer, you can also manually type in the user list or paste it from some external source.
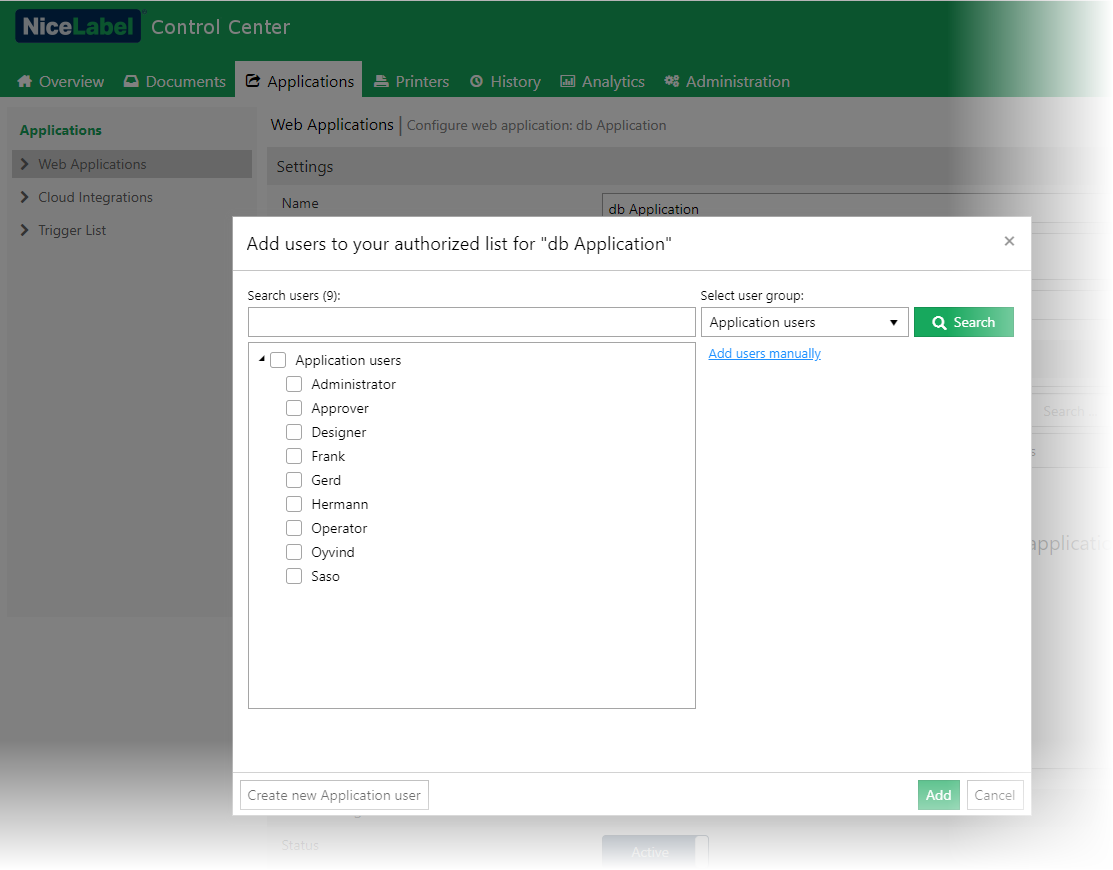
[en] Figure 18: New user interface to authorize the users for running the Web applications
[en] New analytics view “Materials” shows different label sizes on the first level, and used printers on the second level. The production manager can see which materials have been used the most, so they can plan their label stock.

[en] You can filter all views in analytics by the field “metadata”. This is an optional field available with each print event that is filled in by the print process. Typically, you would use metadata to link data from the print event with some other piece of information.
[en] You can also fill the metadata with values from the label that you want to filter the view by, such as “lot number”.
[en] NiceLabel Web Client no longer notifies users about the available upgrades when you start it. Upgrade information is shown in the user drop-down menu in the Web Client. You can start with the upgrade on your own initiative.
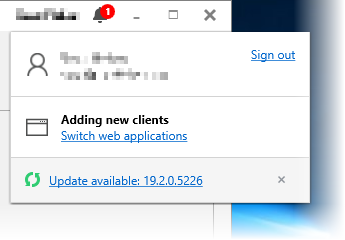
[en] Figure 19: The notification in the caption informs the user about the available software updates
[en] When the upgrade is mandatory, the installer automatically downloads and starts the upgrade.
[en] If your IT team deployed the Web Client to you using the push-installation type, the Web Client does not show any upgrade information. In this case, you do not have permissions to install the software by yourself. Your IT team must make sure you are running the latest version.
[en] With the previous release, Cloud trigger was introduced with NiceLabel Label Cloud products. The trigger introduced printing of data from cloud-based software on printers installed on-premise without requiring you to open any ports in your firewall. You can use the Cloud trigger to send HTTP requests for printing to the Cloud API, which in turn forwards the requests to the respective running NiceLabel Automation configuration.
[en] In this release, the same communication style is available for the on-premise NiceLabel LMS Enterprise. You do not have to know where each Automation server is located, and how to access the server. You only communicate with the Control Center.
[en] Each Automation server registers its Cloud triggers with the Control Center. The clients then consume the API in Control Center, which forwards the request to the respective running NiceLabel Automation configuration for processing.
[en] For example, the Cloud trigger with the unique identifier “MyCloudTrigger” is deployed in NiceLabel Automation. To execute it, you would send the data in HTTP POST/GET request to the address:
[en] http://server/epm/api/trigger/MyCloudTrigger
[en] Where »server« is the name of your Control Center server and »MyCloudTrigger« is the trigger unique name as configured in Automation Builder.

[en] Figure 20: Automation Manager shows real-time Cloud trigger status information
[en] The HTTP request must include a custom header named “Integrator-Key”. This header includes the integration key, which authorizes the call. Generate the integrator key in Control Center.
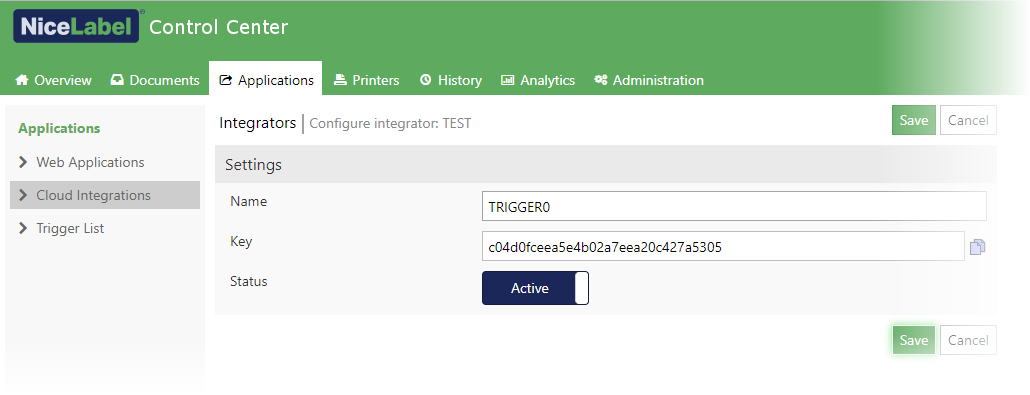
[en] Figure 21: Generating the integrator key in Control Center
[en] JSON data filter enables NiceLabel Automation to process JSON data. JSON uses human-readable text to transmit the data object consisting of name-value (or key-value) pairs and array data types. You configure the filter to parse the JSON data,and provide the list of output fields and their values as a result. You can then print the values on the label.
[en] This is a simple JSON structure:
{
[en] "label_name": "label1.nlbl",
[en] "label_count": 1,
[en] "printer_name": "MyPrinter",
[en] "product_code": "00265012",
[en] "product_name": "SAC.PESTO 250G",
[en] "ean13": "383860026501",
[en] "weight": "1,1 kg",
[en] "composition": "1;2;3",
[en] "variance": "2"
}
[en] JSON filter can extract the “key” (such as “label_name” and “product_name” above) and the respective “value” (such as “label1.nlbl” and “SAC.PESTO 250G” above), and send both to the label.
[en] JSON filter also supports more complex JSON structures and repeatable areas. Each repeatable area provides data for a separate label. In the following example, “LABEL_DATA” array contains data for three labels.
{
[en] "TIMESTAMP": "20130221100527.788134",
[en] "USER": "PGRI",
[en] "LABEL_DATA": [
{
[en] "MAKTX": "MASS ONE",
[en] "MATNR": "28345",
[en] "EXIDV": "012345678901234560"
[en] },
{
[en] "MAKTX": "MASS TWO",
[en] "MATNR": "28346",
[en] "EXIDV": "012345678901234577"
[en] },
{
[en] "MAKTX": "MASS THREE",
[en] "MATNR": "27844",
[en] "EXIDV": "012345678901234584"
}
]
}
Anmerkung
[en] This functionality is available in the products Label Cloud Business, NiceLabel LMS Enterprise, and NiceLabel LMS Pro.
[en] TCP/IP Client trigger is in its core similar to the TCP/IP Server trigger, but with one important difference. As the name suggests, the trigger acts as a client and initiates the outbound connection to the remote TCP/IP server. The trigger executes actions when receiving data from a remote server. The TCP/IP Client trigger keeps a persistent connection with the server, including automatic reconnection if necessary.
[en] Imagine a networked packaging line consisting of Automation server, label printer, and PLC that controls the process. You must print the serialized labels and perform vision inspection of each label. You cannot send a batch of many labels to the printer, printing must be done in-sync with the packaging process. The next label can print on-demand when the previous one has been handled.
[en] NiceLabel Automation connects with the controller and waits for the signal to print the next label. When the running Automation configuration receives the signal, it sends a single label with the next serial number to the label printer. Then, the printing takes place, next, the label is visually inspected, and finally it is applied to the product. If the process is successful, the signal is sent to Automation for the next label, and then the loop repeats.
[en] Automation can also communicate with the controller and provide answers to the questions. You can define a two-way communication process with the controller, if necessary, or strictly use the listen-only mode.
[en] Automation Manager displaying an error message for unfound configurations without discarding them
[en] Automation Manager displays an error after the previously added configuration file (.MISX) cannot be found or loaded. Such configuration is no longer automatically removed from the list.
[en] The warning icon is shown in the configuration list next to the configuration that cannot be loaded. When you select the affected configuration, the error details become visible. Click Try again after resolving the issue to reload the configuration.
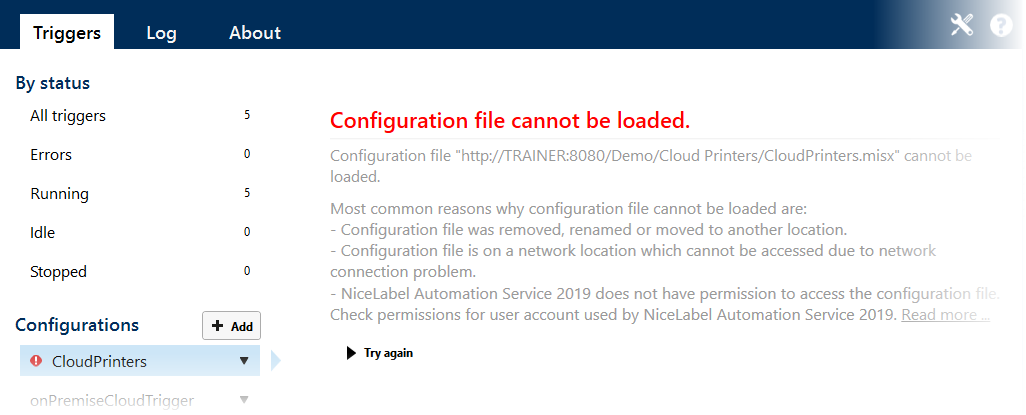
[en] Figure 22: Notification displayed for configuration files that cannot load