[en] The NiceLabel integration platform is now available also in the NiceLabel Cloud Essentials Product to automate printing out of your existing business applications.
[en] NiceLabel Automation is available with the NiceLabel Cloud Essentials and runs at the Easy product level. You can configure integrations with the data coming in from your business system to file drop, database, serial port, or TCP/IP raw communication. The Automation Easy supports CSV and unstructured text data structures to quickly build entry-level integrations.
[en] The Automation Easy supports the entire NiceLabel printer driver portfolio and can also print using third-party printer drivers.
[en] The users of NiceLabel Cloud Essentials can use the built-in Label production approval process that supports the most frequently used practice of single-step approval.
[en] In this case, the label designer creates the label template based on the specifications and submits the label template to the approval process. The QA team member will receive a task, test the label design with the real-case data, and either approve or reject the label. When the label is approved, it becomes visible to production users and available for printing. When the label is rejected, the label designer receives a notification and must make the necessary changes as reported by the reviewer.
[en] You can also use email notifications.
Anmerkung
[en] In the previous version, you could use several approval processes.
[en] We continued the redesign of the Control Center user interface to the responsive Angular framework. In this release, the last important piece of the Control Center functionality was moved to the platform – the Document Storage.
[en] The UI change followed the same path of updates already done for the rest of the Control Center and brings the following important updates:
-
[en] More modern, more user-friendly, faster, and more responsive user interface
-
[en] Faster data access with fewer clicking
-
[en] Additional keyboard shortcuts
-
[en] Label previews
[en] The big obvious new change when you look at the new Control Center is the total overhaul of the user interface. The look and feel remain similar but use new components that provide faster and more intuitive usage of the system. We have carefully redesigned the workspace to modern UI approaches. There is a lot of information available at once, while still not cluttering the screen real estate.
[en] Starting with the workspace composition, there are three panes available, the tree view of the folder structure on the left, the main area with documents from the selected folder in the center, and the information pane on the right side. The information pane is a new component and provides shortcuts to frequently used functionalities that previously required more clicking in the UI. The pane will also display the last five file modification events and details of the last five revisions.
[en] The information pane also displays the preview of the selected label, its basic properties, and the versioning and workflow statuses. You will also have direct access to the history of file changes and their revisions.
[en] You can quickly add or remove the columns you want to use in the displayed grid. You can also click the column names to sort by that column in ascending or descending order. This is a quick shortcut to sort files by the modification date.
[en] The toolbar with icons is no longer available in the new document storage. You would interact with the system using context menus right-clicking the items, using keyboard shortcuts, and using the actions in the property editor on the right-hand side of the workspace. You can right-click folders and files to see the available actions in the context menu.
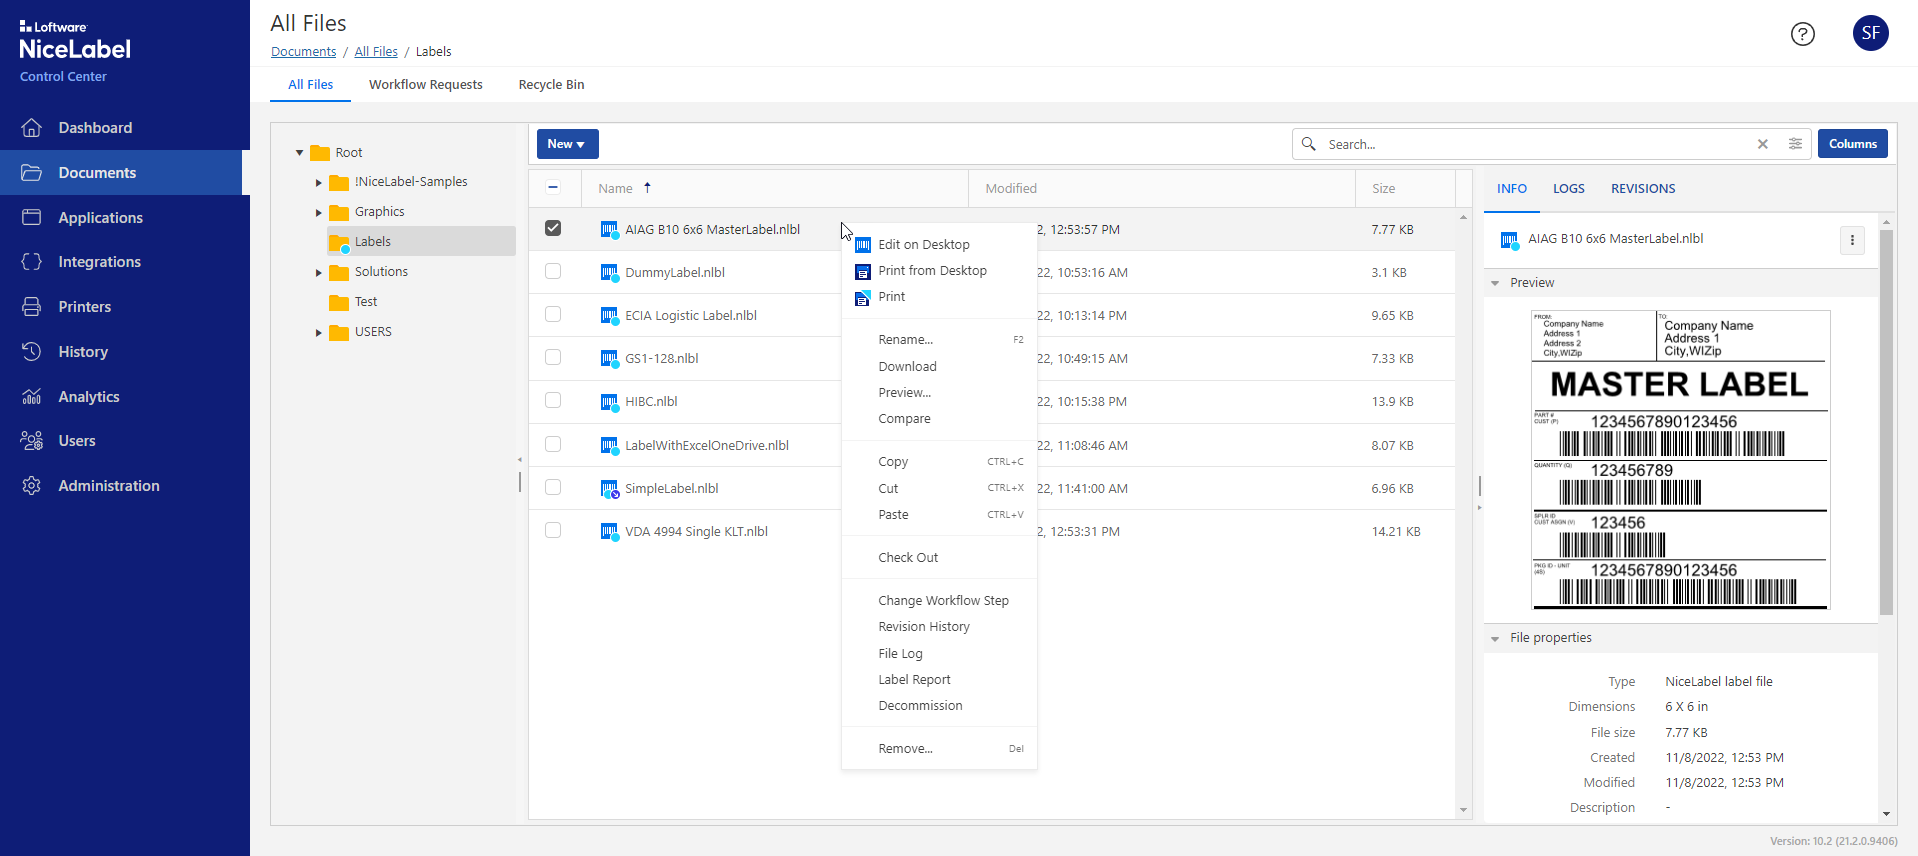 |
[en] You can execute a specific action on a single file or selection of several files.
[en] The visual indicators (icon identifiers) on the folder or file names help users navigate and identify in which states files and folders are. Icon identifiers mark workflows, checked out, decommissioned, and read-only states. For example, a cyan bullet on top of the icons tells you that the folder has workflows enabled. Also, icons in front of the file names help you quickly identify a file type, such as a “label template”, “image”, “PDF”, or “Microsoft Office document”.
[en] The breadcrumb navigation on top tells you precisely the folder path you are currently in. If you want to, you can hide the leftmost tree-view navigation and save some screen space.
[en] For every action, the Control Center will respond with “Toast” status messages providing instant feedback.
[en] The task of uploading files has been reduced to a simple drag & drop to the selected folder. You can drag & drop a single file, a group of files, and also folder structures.
[en] If you prefer, you can still select New>File Upload or New>Folder Upload. The result will be the same.
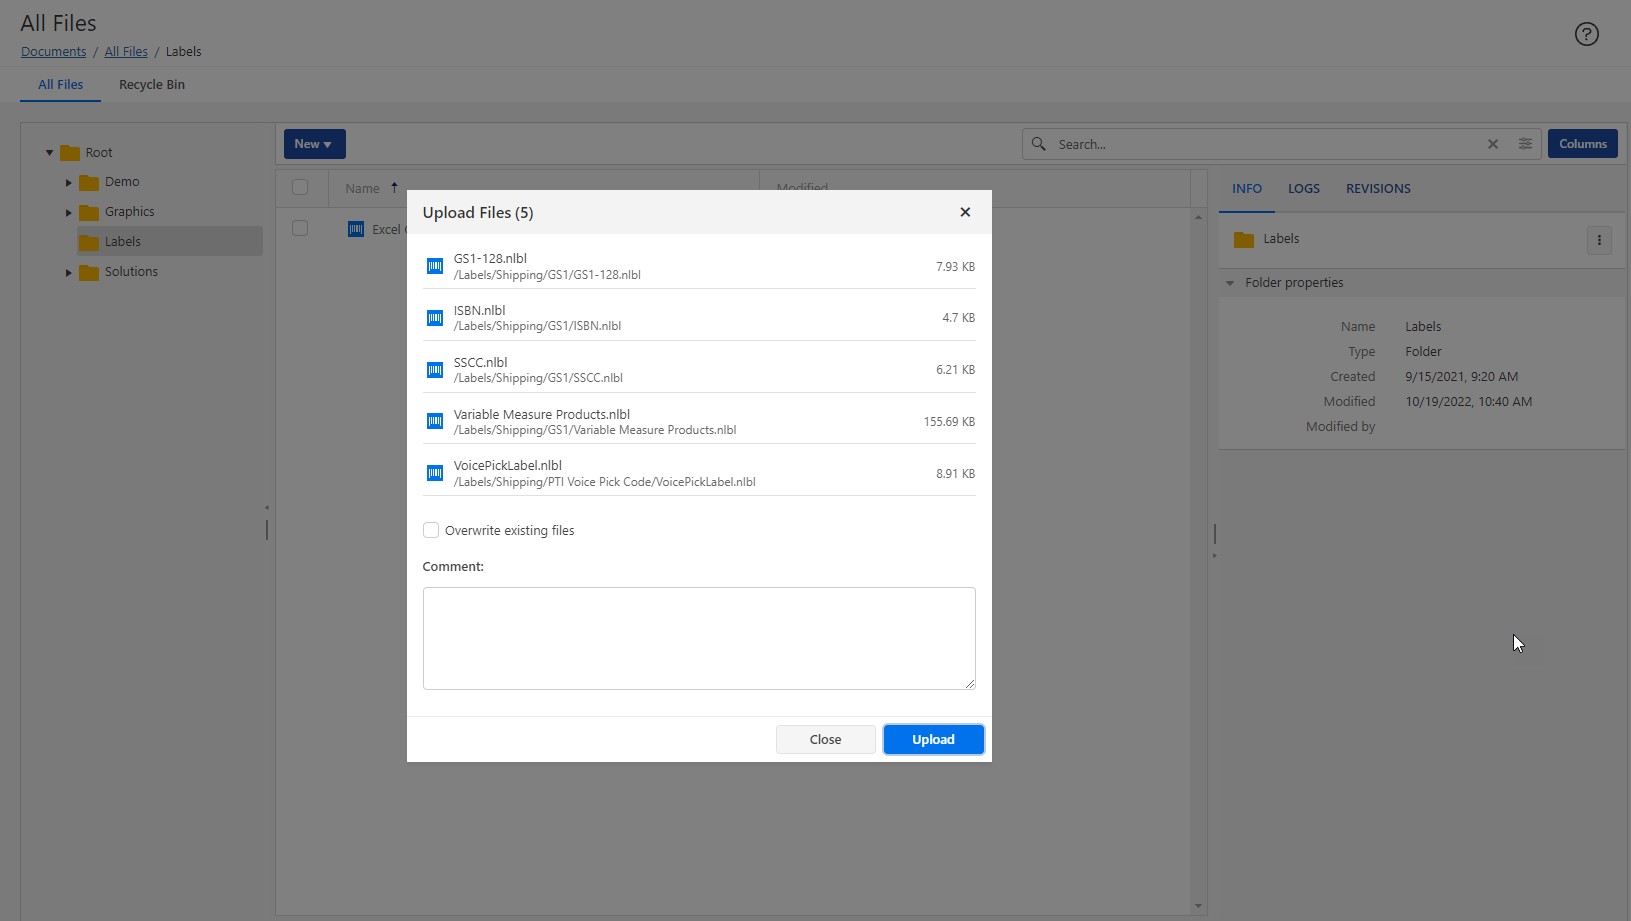 |
[en] Before the upload begins, you can provide the optional comment and choose to overwrite existing files. The Control Center will display the real-time upload status for each provided file.
[en] The new UI also introduces updated search possibilities.
[en] When you search for a specific file or folder name, the result will include items found in the current folder and its subfolders. This allows you to effectively search for an item within some folder structure, not always inside the entire document storage.
[en] The search results will include the found item's full name and its path.
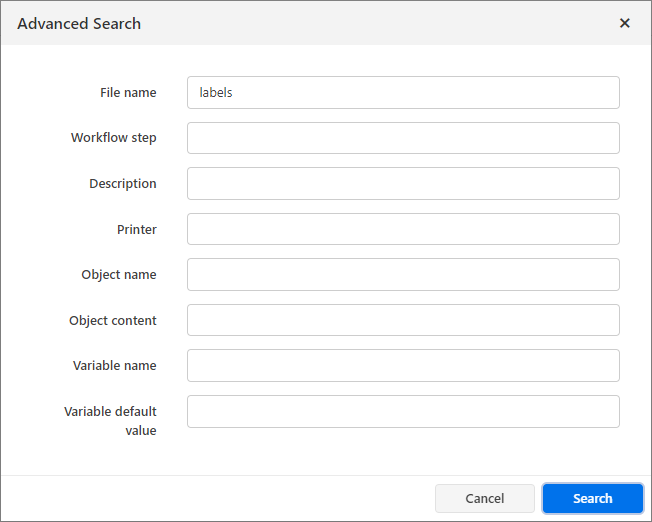
[en] You can also enable advanced search and set more detailed criteria, such as “workflow step”, “printer name”, “object name”, or “variable name”. This helps you narrow down the results in your busy document storage.
 |
[en] You can speed up your usage of the Document Storage with the keyboard shortcuts. The UI supports the standard shortcuts Ctrl+C (for copy), Ctrl+V (for paste), Ctr+X (for cut), Del (for delete), but there is also support for F2 (for rename of file or folder) and “Menu” key (to open context menu).
[en] The Recycle Bin is a new concept in Document Storage. Previously, the deleted files were kept in the original folder and were visible with a special view filter. From this release, all deleted files are visible in the Recycle Bin.
[en] This makes the management of the deleted files more natural. We use the same principle that you are accustomed to from Windows operating system. You can see deleted files from the entire Document Storage displayed together.
[en] When the file is deleted and moved into the Recycle Bin, you can still restore it to an original folder. Once you remove a file from the Recycle Bin, it is gone forever.
[en] For all label files in the recycle bin, you can still download them, see the revision history and generate a label report (for label files).
Anmerkung
[en] You can only restore a deleted file if its folder still exists in the Document Storage.
[en] The label preview is automatically shown inline in the informational pane each time you select a label template. However, you can also open a dedicated Preview window to see more label properties, test the label responsiveness when you apply different values to variables, and see a high-resolution label preview.
[en] To open a dedicated label preview, you can select Preview in the context menu or select Preview from the three dots menu in the informational pane.
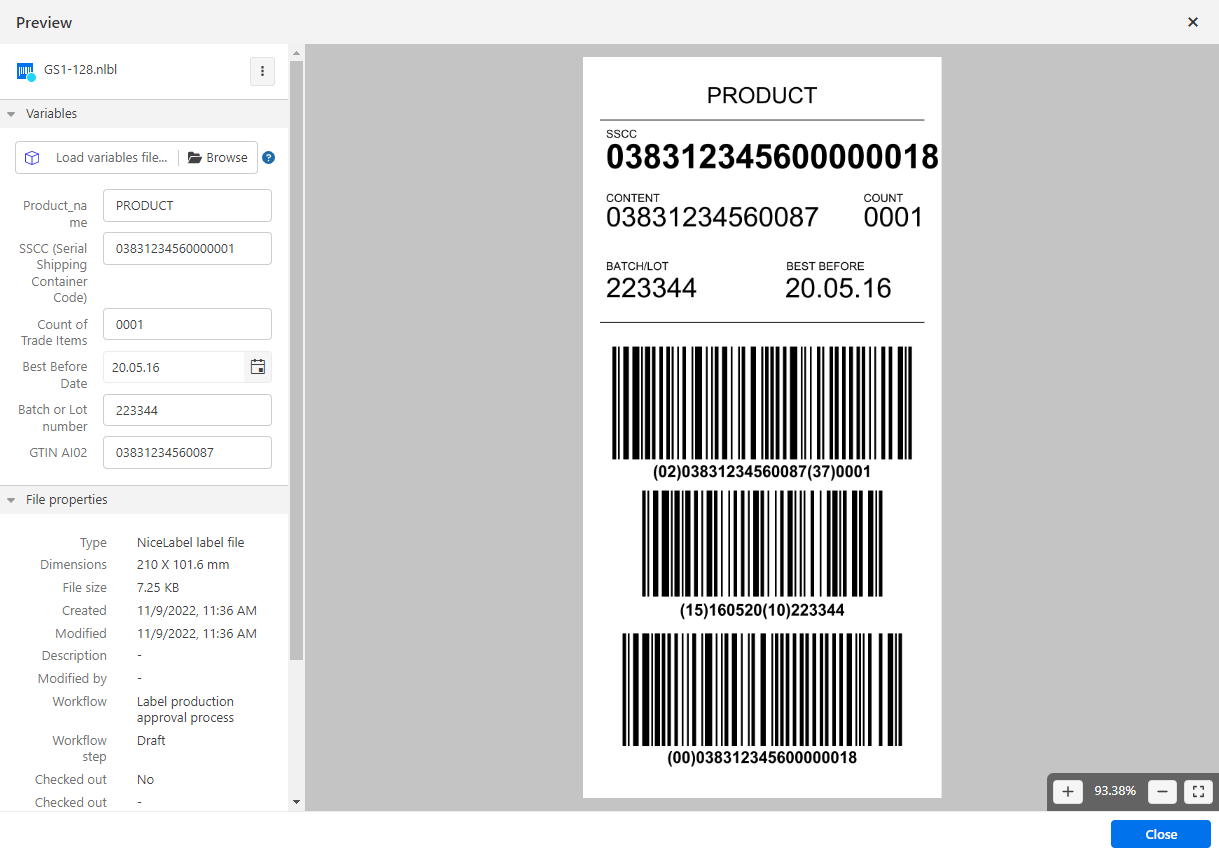 |
[en] You can manually type in values for variables to see how they fit on the label, but you can also load the values from the “variable files”.
[en] You can click the + and – buttons to change a zoom level, but there is also a more useful shortcut of holding the Ctrl key and rotating the mouse wheel while keeping the cursor on top of the preview.
Anmerkung
[en] You can also preview PDF and image files.
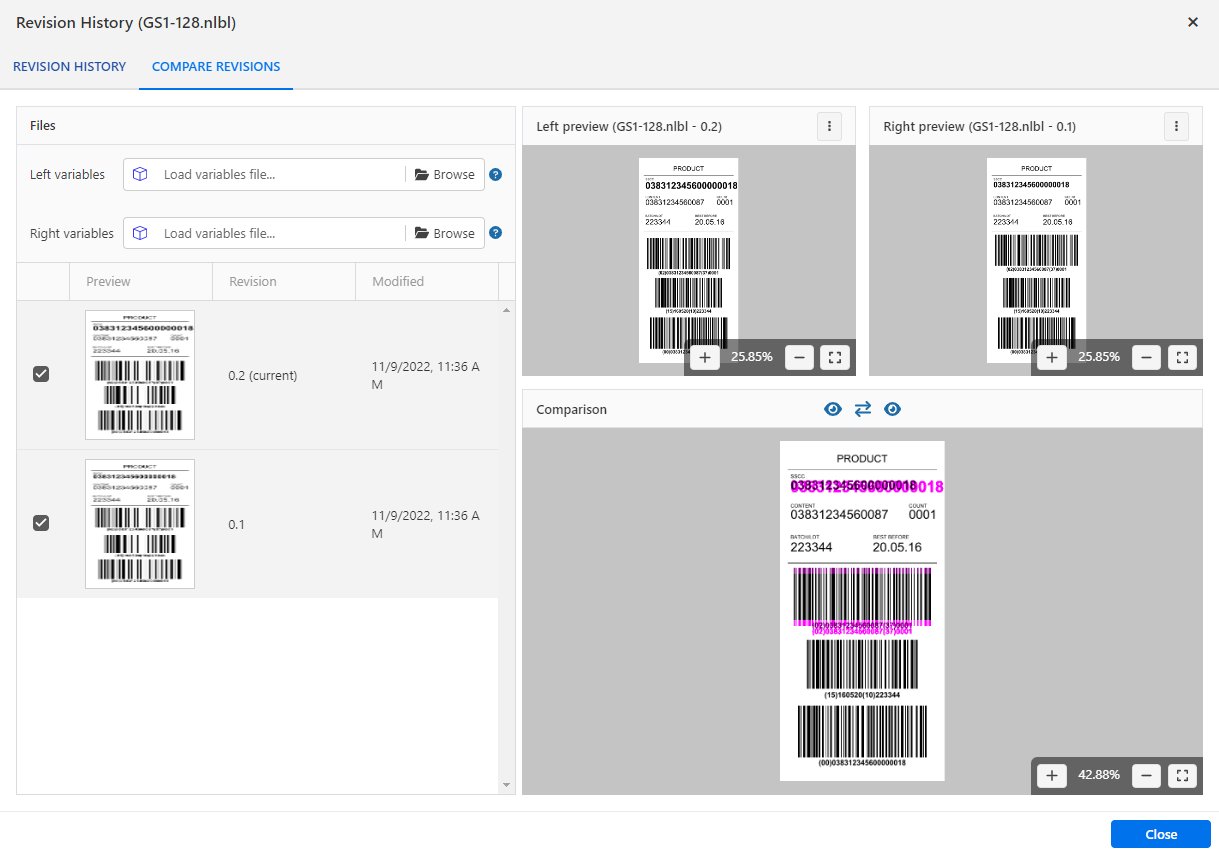
[en] The new Document Storage can also show visual differences between the revisions of the same file or between two different files. You can compare the content of the label templates and of the image files.
[en] You can start the comparison by selecting the Preview in the context menu on a file or on a three-dots button. You can apply the business data to your label preview and see how they respond to the real data.
[en] The visual differences in label compositions are shown with magenta color to easily spot changes.
 |
Anmerkung
[en] The comparison feature can be used in the workflow approval process when the approver must validate the changes made in the label template. The visual check of the old and updated labels can be the first step of the validation process.
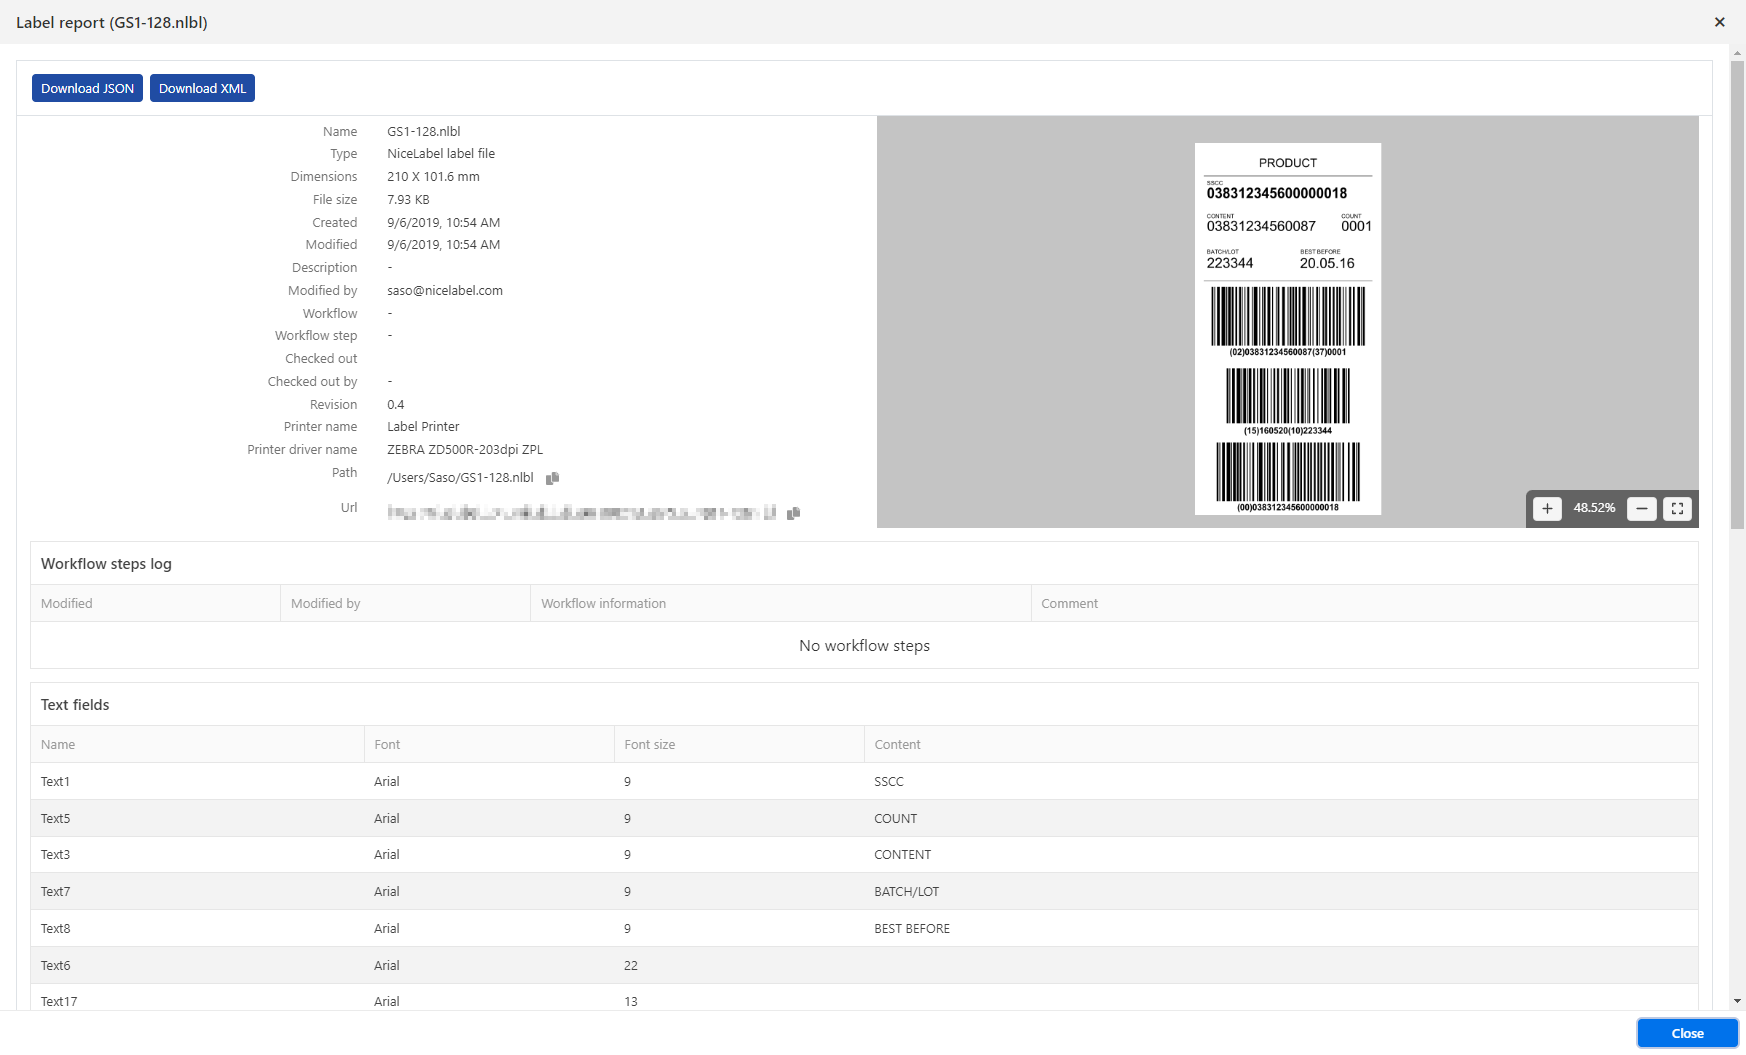
[en] The new UI retained also the ability to create the label reports already available in previous releases. You can create a report for one label template or for multiple selected labels. The report has been expanded to support JSON data syntax as well as XML.
[en] The label report contains:
-
[en] Detailed label metadata.
-
[en] A preview.
-
[en] Workflow information.
-
[en] Structural report for text, barcode, and image objects.
-
[en] The list of variables and their properties.
 |
Anmerkung
[en] The structure of the XML report includes more information than the XML reports from the previous releases and has been changed. If your label catalog processing logic is based on the label reports from the Control Center, you will have to update your data parsing.
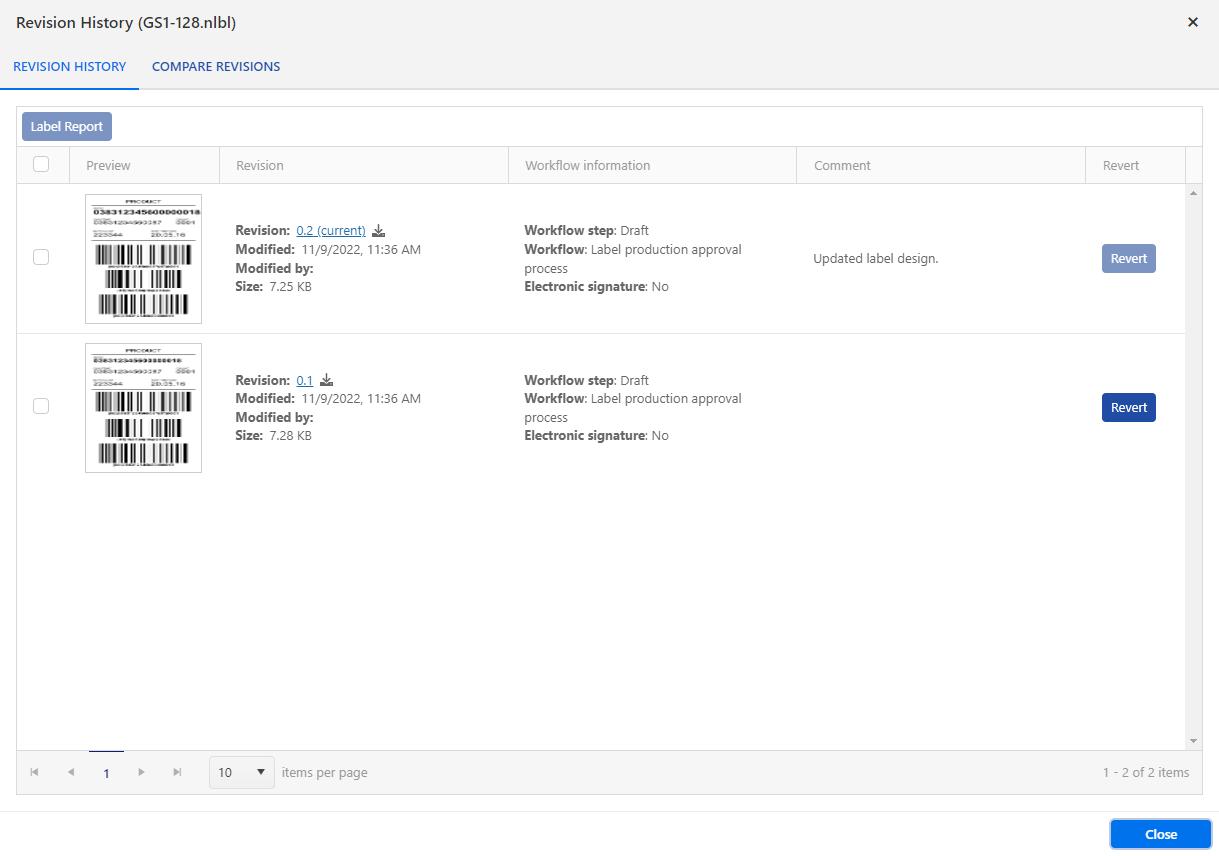
[en] Revision history helps you track changes on your file (revisions, workflow changes).
[en] When you have a change request for a particular label template, the designer would open the template in the NiceLabel Designer application, make the necessary updates and save the template. NiceLabel Control Center will automatically raise the version number. You must provide a mandatory comment.
[en] To see the past revisions of the label template, select the option Revision History from the context menu. You will see a list of all revisions for the selected template with their previews, properties and statuses. You can immediately spot which is the last approved revision (and thus used in the production).
[en] The window provides you with quick access to the next actions that you might need:
-
[en] Label Report. To generate a report about the label composition.
-
[en] Revert. To copy one of the past revisions in place of the newest revision.
-
[en] Compare revisions. To visually inspect the changes between label revisions.
 |
[en] The users can check out, check in files, and discard checked-out files.
[en] The approval workflows in the Document Storage are selectable per folder and are applied to all files in the folder. You can choose between predefined workflow types and also define your own workflow in the Administration section of the Control Center.
[en] The action to select the workflow is available in the context menu when you right-click the folder name or select the three-dots button in the informational pane.
[en] You can choose from:
-
[en] No workflow.
-
[en] Inherit the workflow from the parent folder.
-
[en] Select a workflow from a list of available workflows.
[en] The new UI displays all pending workflow requests in a separate tab in Document Storage. This makes it easier for the workflow members to process their requests.
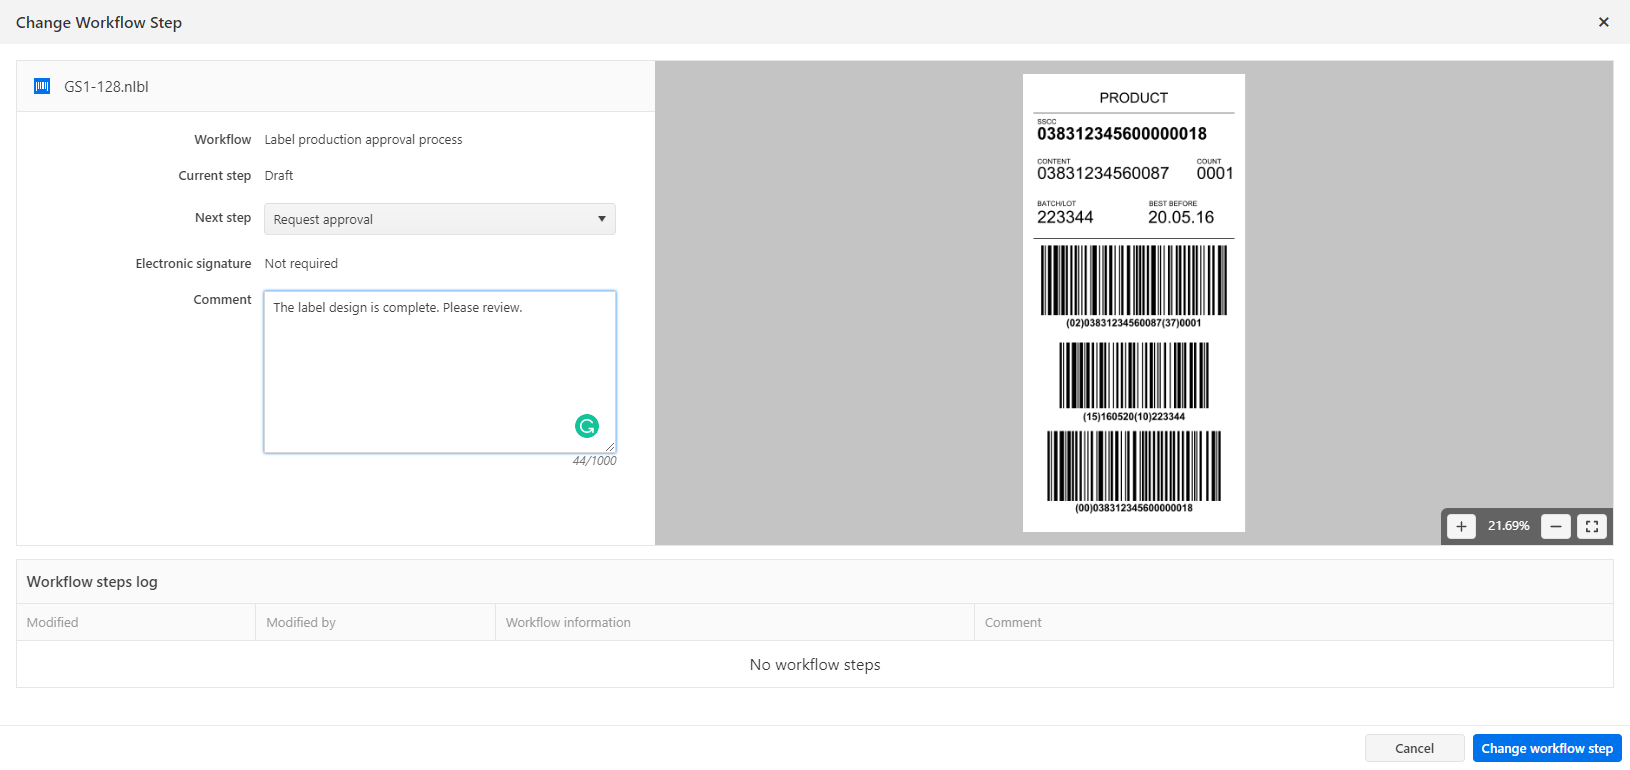 |
[en] To change the workflow step, select the command Change Workflow Step in the context menu. You can also change the workflow step for multiple files simultaneously.
[en] The updated Document Storage supports the digital signature – a mandatory option for companies from the life science field. The user has to re-authenticate before the file can be moved to the next step in the approval process.
Tipp
[en] You can enforce the digital signature for a step when the label template is approved for print production.
[en] The new Document Storage also has the ability to decommission and recommission files.
[en] Decommissioned files become unavailable for print and cannot be accessed by users with read-only permissions (for example, members of the default “Operator” access role). You might decommission a file that is of a seasonal nature and will not be needed in a while – it won’t clutter the view of the print operators.
[en] The decommissioned file will be identified with a red icon with the down-pointing arrow.

[en] To make the file available again, you can recommission it.
[en] The NiceLabel file types used in NiceLabel up to version 6 (LBL, XFF, MIS) are no longer considered a NiceLabel file type. They will appear as the unknown files in the Document Storage.
[en] To use these file in new NiceLabel platforms you must first convert / migrate them to the new file types.
Anmerkung
[en] This functionality is available in the NiceLabel Cloud products only.
[en] NiceLabel 10.2 bring an exciting new printing experience. You can print labels directly from the Control Center user interface – so, directly from a browser. You don’t need a local NiceLabel thin client to initiate the print. Being a browser-based feature, you can print labels from any operating system that can use Control Center in a browser, even macOS and Android devices.
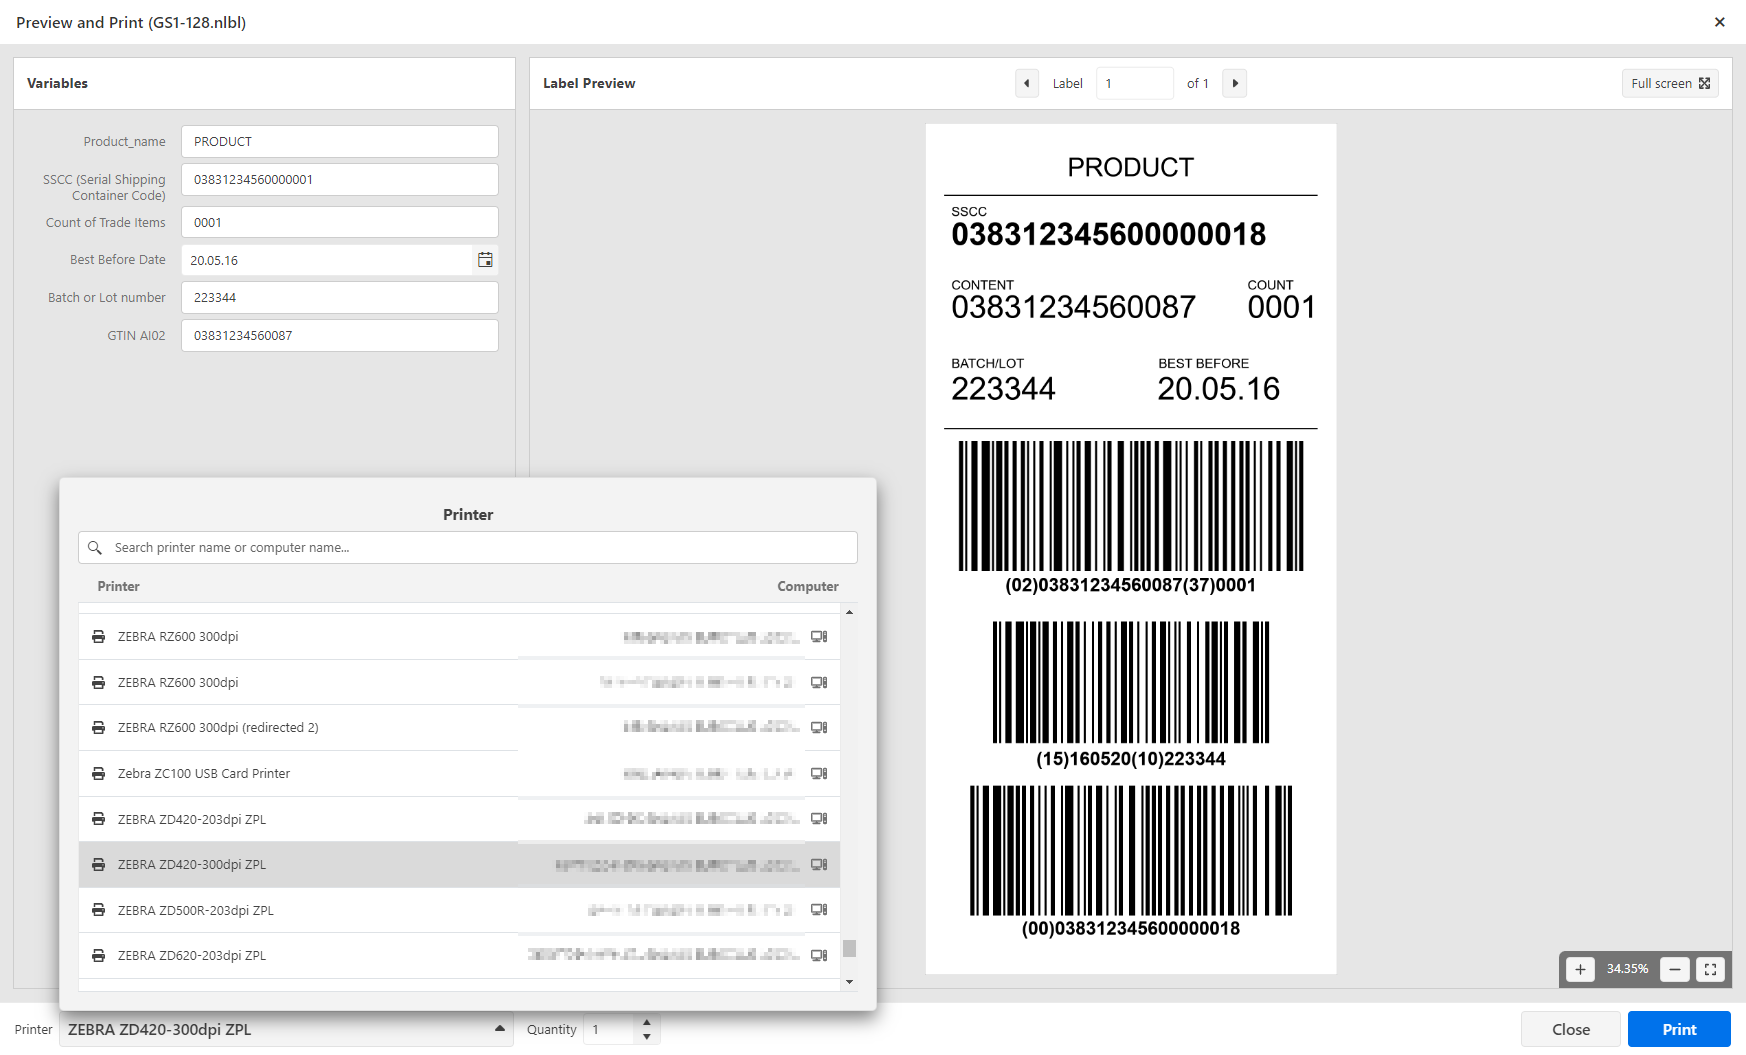
[en] When you choose to print a label from a browser, a default print form will open. You can assign values to the label variables, either typing them in manually or selecting a data file. You will see a nice label preview displaying the label with your data. The web print form also supports another new functionality in the 10.2 release – support for the Cloud data sources: Excel Online and Google Sheets. You can print labels with data coming from your selected Cloud data source.
[en] When it comes to the printer selection, you can choose among all printers registered in your NiceLabel environment, including the Cloud-connected printers.
[en] When you print to on-premise printers the data flow is as follows: the print request is sent from the browser to your local NiceLabel workstation that reports the availability of the selected printer. That NiceLabel workstation merges the label template with the provided data, creates a print job, and sends it to the printer. Your existing NiceLabel client act as a print agent on behalf of the Control Center.
Anmerkung
[en] Your local NiceLabel client must be updated to version 10.2 to print labels from a browser.
[en] The print from a browser will be executed with support for all native printer capabilities, such as printer fonts, barcodes, counters, RFID, and others. This is not graphical-only printing (GDI) and allows the same optimized outputs as when printing from Windows NiceLabel applications.
[en] This new functionality is also beneficial in the approval workflows, as you can easily print out a label to visually inspect it – all without a need for your own locally installed NiceLabel client.
Tipp
[en] We have extended the Cloud Print API to support printing to your on-premise printers using the same mechanism.
[en] Cloud data sources are essential in real-time co-authoring scenarios when you want team members to work on the same data, collaborate, and share documents. This is even more prevalent today with the mix of home and office workplaces. When it comes to label printing, you always have to provide a source of data that you want to see printed on a label. The data is not always stored in corporate-level storage, such as Microsoft Azure SQL, Amazon RDS, or some on-premise SQL server. The users will often save their data in some easy-accessible data storage, such as a spreadsheet saved in Microsoft OneDrive or Google Drive.
[en] With the NiceLabel 10.2 release, NiceLabel has native support for Excel Online and Google Sheets. You can select a new type of data source in the database wizard. You first have to sign in using Microsoft or Google authentication and then you have access to all your Cloud data sources. The columns from your spreadsheets will be represented as the fields in the label template – the field names are taken from the first row of your data.
Tipp
[en] Printing is available from the spreadsheets that you have created and also from the spreadsheets shared with you by other users.
[en] You can use Cloud data sources in all cases when you use forms to print your labels:
-
[en] The new feature to print labels from a Control Center in a browser
-
[en] The forms in NiceLabel Print
-
[en] The forms in NiceLabel Web Client
Anmerkung
[en] Printing labels with Excel Online or Google Sheets is not supported by the integration platform – NiceLabel Automation.
[en] The LPS trigger type in the NiceLabel Automation enabled the quick and easy replacement of the Loftware LPS integration system with the Loftware NiceLabel. In this release, the LPS trigger support has been expanded with the support for asynchronous requests.
[en] When you issue a synchronous request to the LPS trigger, NiceLabel Automation processes the data, prints the labels, and then provides the status back synchronously – over the same communication channel the client has established. The client waits until NiceLabel Automation provides a status.
[en] When you issue an asynchronous request to the LPS trigger, NiceLabel Automation immediately responds with “OK, I have received your data – here is your job number.” The client disconnects. However, after the job is processed and printed, the client can send an inquiry about the job status. Because the inquiry does not happen in sync with the processing but at a later time, the communication is referred to as “asynchronous”.
Anmerkung
[en] You need NiceLabel Cloud Business or NiceLabel LMS Enterprise (or higher) to use the LPS trigger. The trigger must also be enabled through your license.
[en] The parsing of PAS files has been updated to allow a single double quote character (“) to be treated as regular text content and used on the label. Previously, NiceLabel expected the double quote to be used as a text qualifier – a character placed around each field to signify the data for that field. When you provide a single double quote character in the field data, it will print as expected. The most common usage of this scenario is printing double quotes as an inch indicator.
[en] For example:
*FORMAT,part10.nlbl
Part_ID,1/4”PLEX
*QUANTITY,1
*PRINTLABEL
[en] You can provide multiple print jobs in a single request to the Workday API. The response will contain statuses for each print job in the same order as they were provided in the request. The HTTP status code can be just one per request. Because Workday relies heavily on the status codes, not so much on the response message, we have changed the rules for the returned status code.
[en] The API returns the following status codes:
-
[en] 200. All print jobs in the request were processed successfully.
-
[en] 500. All print jobs in the request failed.
-
[en] 207. Some print jobs were processed successfully and some failed. The response body contains status details for each print job.
[en] When Windows 11 was initially released, it also introduced a problem in the internal libraries handling GDI printing (this is the printing of graphical objects). NiceLabel uses these libraries to image the GDI-only objects on the label, such as a Rich Text Box object. The problem occurred in multi-threaded print scenarios, where multiple labels were being processed at the same time. This is typically an integration scenario where NiceLabel Automation could process many labels simultaneously.
[en] Until Microsoft resolved the problem, NiceLabel Automation was locked to process just one label template at a time. We sacrificed the processing power in favor of successful print.
[en] With NiceLabel 10.2 release, the multi-threaded print is enabled again. Additionally, there is an option available in the product.config - NiceLabel’s configuration file – to disable the multi-threading support yourself.
[en] The Get Label Information action provides you with the label metadata information, such as label dimension, name of the used printer driver, and a list of all variables. This information is useful in integration scenarios, where you might need to know variable names from the label template in your business system – to send data to them at print time.
[en] From this release, the action is available with the NiceLabel Automation Pro product level.
[en] The NiceLabel’s XML command file has been updated to support the additional parameters from the Print action. The “session_print_job” XML element supports the following parameters provided as XML attributes: skip, identical_copies, and number_of_sets.
[en] An example:
<label name=" SampleLabel.xnlbl" close="false">
    <session_print_job printer="ZEBRA 170PAX4 300DPI" quantity="1">
        <session quantity="10" skip="2" identical_copies="1" number_of_sets="4">
            <variable name="Variable_Text">test value</variable>
        </session>
    </session_print_job>
</label>
[en] The Cloud Print API is the Application Programming Interface based on the HTTP REST that provides the ability to print labels to your printers. From the 10.2 release, you can use the Cloud Print API not only for printing to true cloud-connected printers but also for your on-premise printers that do not have native cloud capabilities.
[en] In this case, the Cloud Print API will forward the print request to the specified local workstation on-premise, which will create a print job and send it to the printer. The communication from API to the local environment take place over the encrypted and protected Azure Servise Bus connection.
Anmerkung
[en] The API works as the proxy, forwarding the request to processing to a local workstation.
[en] The Document API is documented in the Developer Portal website.
[en] The Document API is the Application Programming Interface based on the HTTP REST that provides the ability to run the actions in the Control Center’s Document Storage from the outside – not using the UI available in the Control Center.
[en] The Document API was heavily updated for NiceLabel 10.2 release to support all new functionalities introduced with the new release. The totally redesigned UI works on the backbone of the Document API. The new functionalities from the UI are also available through the API should you want programmable interaction with the files.
[en] For example, the Document API is useful, when you want to update file statuses from your PowerForms applications or from the Automation configurations. This is a powerful feature, but it does require more technical skills from the users.
[en] The Document API is documented in the Developer Portal website.
[en] Here are some highlights from the new release:
-
[en] Get all files that are in the waiting for approval state
-
[en] Rename a folder
-
[en] Sort the items in a list by a specified field
-
[en] Decommission and recommission files
-
[en] Get a changelog for the specified folder
-
[en] Get a changelog for the specified file
-
[en] Get a revision history list for a file
-
[en] Support for sending notification emails
-
[en] Get a list of deleted files (from the Recycle Bin)
-
[en] Support for thumbnails in responses
-
[en] And many more